 Need Maleficent horns ASAP for Halloween? Here’s how I made a headpiece, inspired by the 2014 movie version of Maleficent. I made these pretty quickly so the process isn’t documented as well as I would have liked, but hopefully you’ll find some useful tidbits!
You will need:
- Craft foam
- Electrical tape
- Reticulated foam (upholstery foam or styrofoam could work too)
- Black faux snakeskin or pleather fabric
- Tin foil and duct tape (for the helmet template)
- Utility knife
- X-acto knife
- Scissors
- Contact cement
- Paper and sharpie (for the helmet and horn template)
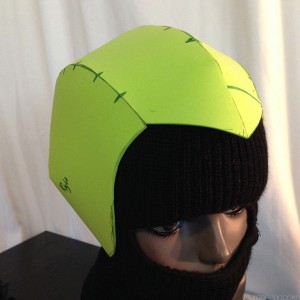
1. Make a helmet with craft foam.
 I learned out to make this helmet from Evil Ted Smith’s Youtube tutorial. Watch his video to learn how to make a helmet template that fits your head. Instead of using thick EVA foam, I used craft foam for a more flexible headpiece. I was a bit rushed so the seams aren’t as smooth and rounded as they could be.
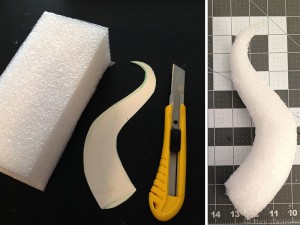
2. Draw a horn template, trace it onto reticulated foam, and carve it out.
 Draw a horn shape on paper. If you need a template, check out my Maleficent Horn Printable Template digital download. Cut the paper template out, then trace it onto a block of reticulated foam or upholstery foam. Remember to trace out the horn twice.
Then carve the horn out of the foam with a utility knife or with scissors. Make sure the blade is sharp. Compare your horns with each other to be sure you’re getting the right shape. You can find upholstery foam at most fabric stores. Reticulated foam is often used as padding in packaging so you might need to hunt around for some.
 If your foam is not thick enough, glue two sheets together with rubber cement or liquid latex.
 Use scissors or a box cutter to shape the horns, as if you are whittling a piece of wood. As you work on the second horn, compare it to the first one to be sure they are the same shape.
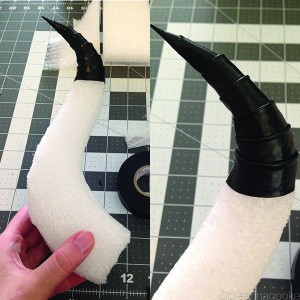
3. Cover the horns with electrical tape.
 I used electrical tape to create the horn ridges. Instead of wrapping the electrical tape around in a spiral, I cut each piece individually. Fold over the top edge of the tape to achieve the ridged effect. For a more realistic-looking horn, you can make the ridges with paper towels and liquid latex. Check out my demon horn tutorial over at Make Magazine that outlines those steps in detail.
4. Glue snakeskin fabric on the front of the headpiece.
 Use contact cement to apply the fabric to the front and fold it under the front edge.
5. Glue horns on and cover the helmet with electrical tape.
 Glue the horns on with contact cement. To cover the rest of the helmet with tape, start at the base of the horns and weave your pieces of electrical tape around the helmet. I cut shorter pieces instead of trying to wrap long pieces all the way around. Continue to fold the top edge of the tape over to achieve ridges all the way down.
6. Go be fierce!
Need a Maleficent cloak and collar?
Check out my (very hastily made) cloak using a graduation gown as the base and craft foam with wire to make the collar. I’ve outlined the materials and steps here in this blog post.
Need makeup product ideas?
Visit my Amazon Storefront for some makeup and body paint product recommendations.


 Artists have 6.5 hours to paint a model (with the help of an assistant if you have one). Then we each have 1.5 minutes to present our creations to a panel of judges. After the judging, there is opportunity for photos and then an evening runway show. Artists can select music and prepare a statement to be read by the MC while their model walks/dances/twirls down the runway for 2 minutes. It’s the most amazing spectacle of art!


