When I made my Flying Monkey costume, I never dreamed that I would meet a Wicked Witch of the West! Chelphie Cosplay is the creator and wearer of this fantastic witch costume and she has a pretty spectacular cackle too — just ask! Our dynamic duo has been spotted at a few events and we even placed 2nd in the 2013 Dallas SciFi Expo Costume Contest. Check out some of the photos:
Photo by Ken Pearson Photography
Photo by Vodka Photos
Photo by Last Ryghtz
Photo by Alan Tijerina
Read my Flying Monkey Costume blog post to see more behind-the-scenes photos for my monkey costume.
When the Dallas Museum of Art hosted a Wizard of Oz-themed Late Night event, I couldn’t resist making a Flying Monkey costume with my own twist! I already had the black feathered wings, so I just needed to make the outfit. Below are some behind-the-scenes photos of how I put it all together:
1. Hat
The hat is made from a Laughing Cow Cheese container, craft foam, and cotton fabric. Unfortunately I didn’t document it well while I was working on it. The side of the hat is craft foam covered in fabric. I used spray glue (Super 77) to glue the fabric to the craft foam. I drew the zigzag design on paper, then traced it on the red, white, and black fabric, and made each one slightly larger than the last. The zigzag pieces of fabric were also glued with spray glue. I also added a chin strap with thin elastic, like the elastic on party hats.
Materials:
Laughing Cow Cheese container (empty)
Craft foam
Cotton Fabric: light blue, red, white, black
Spray Glue (Super 77)
2. Wig
The wig started out as a weird Moses/Zeus wig from Party City. I didn’t have enough time to order anything online, so I used what I could buy locally. Armed with scissors, I slowly cut away at it to give it the signature widow’s peak of the monkeys (and most simians) in the 1939 edition of Wizard of Oz. I had my doubts at first but I’m really pleased with how it turned out.
Materials:
Grey wig
Scissors
Head form
3. Jacket
I created a paper pattern for the jacket based on reference photos and an existing fleece vest I own. Using plain cotton fabric in light blue, red, white, and black, I cut out all the layers to create the zigzag pattern and jacket base. I glued the zigzag layers together with spray glue (Super 77), attached it to the blue part of the jacket, and added interfacing to give the whole jacket the structured shape. I also added slits in the back of the jacket (not shown) for my wings to poke out.
Materials:
Cotton Fabric: Light blue, red, white, black – measure the amount you need based on your paper patterns and don’t forget about the hat!
Interfacing
4. Bodysuit
This costume, like my dragon costume, features a hand-dyed and painted bodysuit. I first tested the dye on a scrap of Lycra (1st image). I used Jacquard’s Dye-na-flow black, watered it down, added a few drops of Jacquard’s AirFix, and brushed the dye onto the bodysuit. Once it was dry, I painted on the fur with Jacquard’s Neopaque and Lumiere fabric paints.
Materials:
1 white Bal Togs body suit
1 bottle Jacquard Dye-na-flow black
1 bottle Jacquard AirFix
Jacquard Fabric Paints: Black and White (Neopaque), Pewter and Pearlescent Blue (Lumiere)
Paint brushes
5. Feet
I wanted to look like I was barefoot without actually being barefoot! Using some white socks (synthetic fabric), I stuffed them with polyfill, then dyed and painted them with fabric paints (same as used on bodysuit). I applied Zombie Skin (a creamy latex) to the toes to reinforce the toe area. I pulled the stuffing out of the socks, added some foam insoles, then cut out holes for each my toes. When I wear the costume, I paint my toes with same blue bodypaint I use for the face (see #7).
Materials:
White Socks (synthetic fabric, like liner socks)
Zombie Skin (latex)
Polyfill (or rags to stuff inside)
Fabric paints and dyes (see #4 Bodysuit)
6. Wings
I made these wings a few years ago for my Harpy costume but they worked well for my monkey costume too. The frame was commissioned from Danielle Hurley and she does amazing work! I used chicken wire as the frame for the wings and hot-glued it to black canvas. I hot-glued approximately 350 black turkey feathers for the wings and used down from a black feather boa for the top. Needless to say, these wings are a tad heavy but they are definitely sturdy!
Materials (for the wings, not the frame):
Black canvas fabric
Chicken wire
Gloves and wire cutters
Black turkey feathers
Black feather boa
7. Face
I followed reference photos from the movie so I could capture the big smirk of the monkeys. Since I wasn’t using any prosthetics, I also needed to give the illusion of monkey features with makeup. I painted my nostrils black to make them look wider and added accent lines to widen my nose and mouth. I used professional water-based bodypaint to paint my face, hands, and toes and red lipstick on my lips.
Bodypaints (all water-activated cakes):
I’ve created an Amazon list with most of these products.
I’ve also been known to hang around with a certain Wicked Witch of the West (Chelphie Cosplay) at various events. Have a look at photos of our dynamic Oz duo.
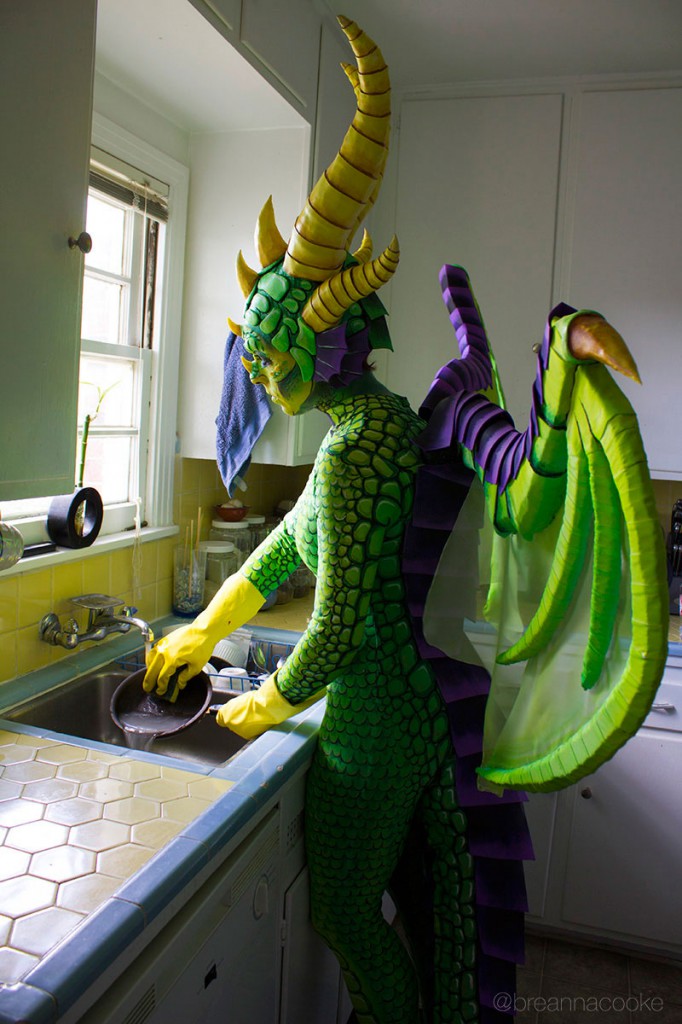
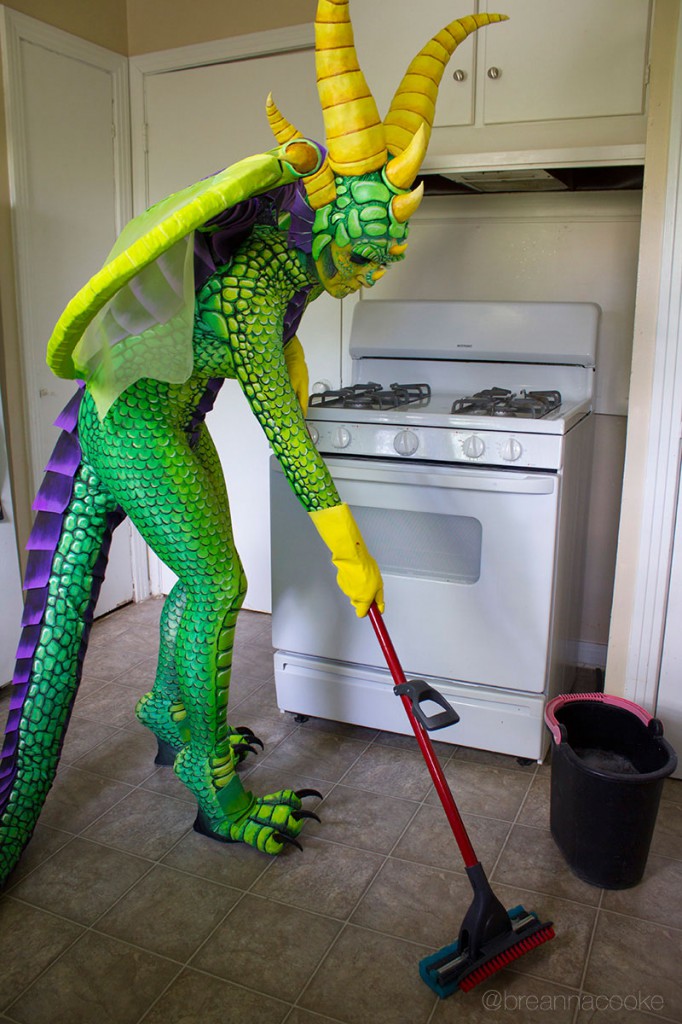
Ever wonder what dragons do all day? You may think that they just hoard gold and breathe fire, but dragons lead a surprisingly normal life. Here’s a glimpse into what goes on:
First, they sit and think.
Then they start working on some chores, like mowing the lawn,
And watering the plants.
They spend time keeping their claws nice and tidy.
They take breaks by watching movies,
And make afternoon snacks.
They clean up the dishes,
And mop the kitchen floor.
Then to top off the day, they go for a car ride! Wheeee!
Photography by Brian Merlo
Interested in seeing how this costume was created? Check out my blog post: Green Dragon Costume
Need Maleficent horns ASAP for Halloween? Here’s how I made a headpiece, inspired by the 2014 movie version of Maleficent. I made these pretty quickly so the process isn’t documented as well as I would have liked, but hopefully you’ll find some useful tidbits!
You will need:
Craft foam
Electrical tape
Reticulated foam (upholstery foam or styrofoam could work too)
Black faux snakeskin or pleather fabric
Tin foil and duct tape (for the helmet template)
Utility knife
X-acto knife
Scissors
Contact cement
Paper and sharpie (for the helmet and horn template)
1. Make a helmet with craft foam.
I learned out to make this helmet from Evil Ted Smith’s Youtube tutorial. Watch his video to learn how to make a helmet template that fits your head. Instead of using thick EVA foam, I used craft foam for a more flexible headpiece. I was a bit rushed so the seams aren’t as smooth and rounded as they could be.
2. Draw a horn template, trace it onto reticulated foam, and carve it out.
Draw a horn shape on paper. If you need a template, check out my Maleficent Horn Printable Template digital download. Cut the paper template out, then trace it onto a block of reticulated foam or upholstery foam. Remember to trace out the horn twice.
Then carve the horn out of the foam with a utility knife or with scissors. Make sure the blade is sharp. Compare your horns with each other to be sure you’re getting the right shape. You can find upholstery foam at most fabric stores. Reticulated foam is often used as padding in packaging so you might need to hunt around for some.
If your foam is not thick enough, glue two sheets together with rubber cement or liquid latex.
Use scissors or a box cutter to shape the horns, as if you are whittling a piece of wood. As you work on the second horn, compare it to the first one to be sure they are the same shape.
3. Cover the horns with electrical tape.
I used electrical tape to create the horn ridges. Instead of wrapping the electrical tape around in a spiral, I cut each piece individually. Fold over the top edge of the tape to achieve the ridged effect. For a more realistic-looking horn, you can make the ridges with paper towels and liquid latex. Check out my demon horn tutorial over at Make Magazine that outlines those steps in detail.
4. Glue snakeskin fabric on the front of the headpiece.
Use contact cement to apply the fabric to the front and fold it under the front edge.
5. Glue horns on and cover the helmet with electrical tape.
Glue the horns on with contact cement. To cover the rest of the helmet with tape, start at the base of the horns and weave your pieces of electrical tape around the helmet. I cut shorter pieces instead of trying to wrap long pieces all the way around. Continue to fold the top edge of the tape over to achieve ridges all the way down.
6. Go be fierce!
Need a Maleficent cloak and collar?
Check out my (very hastily made) cloak using a graduation gown as the base and craft foam with wire to make the collar. I’ve outlined the materials and steps here in this blog post.
Need makeup product ideas?
Visit my Amazon Storefront for some makeup and body paint product recommendations.
I’m so thrilled and honored to have taken part in Living Art America’s North American Bodypainting Championships in Atlanta, GA. My presentation took 1st place in the Emerging Artist category!
About the art:
Event Theme: Future Vision This piece is a tribute to Voyager 1 — the first human-made object to travel outside our solar system. Contained on Voyager is a golden record with music and images of life on Earth (DNA, human figures, trees, plants) to hopefully be discovered by beings somewhere in the universe. The headpiece takes inspiration from H.R. Giger’s biomechanical female aliens and hints at the idea of an alien discovering the record and incorporating into her body. Voyager 1 and 2 also gave us the first hi-res images of Jupiter, Saturn, Uranus, Neptune and beyond. So order to gain a clear vision of our future, we must reach forward through the solar system and light years, but also look back at the past, to see where Voyager is taking us.
About the event:
Artists have 6.5 hours to paint a model (with the help of an assistant if you have one). Then we each have 1.5 minutes to present our creations to a panel of judges. After the judging, there is opportunity for photos and then an evening runway show. Artists can select music and prepare a statement to be read by the MC while their model walks/dances/twirls down the runway for 2 minutes. It’s the most amazing spectacle of art!
About the paint and props:
All the paint is professional grade body paint and artists can do a combo of brush/sponge or airbrush. I only used brush and sponge for my piece. Models must also wear some sort of thong and pasties. I created the headpiece ahead of time with EVA foam (anti-fatigue mats), craft foam, and pipe insulation. The record was a real record (Barry Manilow to be exact) and was painted gold. The shoes were also created ahead of time and are heel-less shoes with craft foam vines/plants built on top.
Photography: David Leo Photography
Photography: Atlanta Event Photography
Photography: Walt Weiss
Photography: Atlanta Event Photography
Photography: Atlanta Event Photography
Photography: David Leo Photography
Photography: Walt Weiss
If you live in Atlanta, you’ve got 3 amazing opportunities to see beautiful body painting this week!! Be sure to buy your tickets in advance, tickets will not be sold at the door.
This past May at Dallas Comic Con 2014 I opted for a scan session to have my dragon costume 3D printed as a small figurine. It was a really cool process and such a unique way to capture all the hard work that went into the costume.
Step 1: Scan Session
It was like being a movie star! Lots of flash bulbs and cameras capturing me from all sides. I did a couple different poses but this was the final one we chose.
Green Dragon Costume
Step 2: Creating the 3D model
These next steps were all done by Captured Dimensions. All I had to do was approve the final model before they sent it off for print. Check it out below! It even earned a “Staff Pick” badge on Sketchup. Twirl the model around to see all sides.
Halloween 2013 was the year for a dragon! I took most of my inspiration from Ysera in World of Warcraft. I’ve outlined most of the process in my tutorial on instructables.com. Go check it out there or take a look at my process photos below. I also won a 2nd prize from Instructables for my dragon, yea!
My tutorial also received a great write-up by the Dallas Morning News Arts Blog and they also explain how you can earn DMA Friend rewards points for dressing up. KERA’s Art & Seek blog also featured my tutorial in their Tuesday Morning Roundup.
See you at the DMA, in costume (of course)!
Update 09/17/2022: The link on the DMA website is broken. Here’s the full blog post below.
How to Create a Greek Hero Costume
Need help creating a Greek mythology costume for the DMA’s Late Night this Friday? Below are some simple steps to make your own costume without sewing or spending a lot of money. We’ll start with making a chiton (pronounced khitōn), the draped garment typically worn in ancient Greece.
Supplies
• White sheet OR 2 yards (approx.) of white or cream fabric: It should be long enough to hang from your shoulder to the floor. If you want it to be knee-length, you’ll only need about 1.5 yards or less.
• Safety pins: We’ll be pinning the fabric together, but you can also sew it together.
• Gold rope, belt, or ribbon
• 2 brooches (optional)
Making a Greek Chiton
1. Cut the Fabric
Cut the fabric lengthwise so you have two long rectangles. One rectangle is the front, and the other is the back. If you’d like to have a knee-length chiton (more common for men), this is a good time to cut it shorter. (Bonus: If you don’t like the frayed edge at the bottom of the fabric, you can glue gold ribbon along the bottom edge to cover it.)
2. Pin the Shoulders and Sides
With safety pins, fasten the top corners of the front to the top corners of the back. You’ll want to bunch the fabric together a bit as you pin it. Be sure to tuck in the edges of the fabric if it’s fraying. Next, pin the sides of fabric together along your ribcage. It doesn’t have to be perfect, this is to help keep the fabric from blowing open.
3. Tie on Your Belt
Tie your belt around your waist or rib cage. You can use any kind of belt, rope, or ribbon. You can even paint something gold if you don’t have anything.
4. Add the Brooches
Pin your brooches to your shoulders. You can use them to hide the safety pins. I didn’t have any brooches, so I bought some earrings at a thrift store, glued them together, and added a pin to the back. You could even make your own out of cardboard or craft foam and paint them. Get creative!
Accessories and Props for Your Specific Greek Character
It’s time to customize your outfit with some props. They don’t have to be complicated in order to be effective. Below are some simple ideas to help identify yourself as a specific character: 1. Lightning Bolt and Beard = Zeus, King of the Greek Gods Lightning Bolt: Draw a lightning bolt on foam board or poster board; cut out the shape and color with silver paint. Beard: Paint on a beard with face paint OR purchase a beard from a party or costume store.
2. Laurel Wreath = Apollo, God of Music, Arts, and Enlightenment Laurel Wreath: Create a headband with poster board. Draw leaves and cut them out. Use hot glue to stick the leaves in place, overlapping as you go. Color with gold spray paint.
3. Feathery Wings = Eros, God of Love (Cupid!), or Nike, Goddess of Victory Wings: Purchase wings from a costume or party store OR draw wings on poster board. Cut out the shape of the wings, attach elastic straps with hot glue, and loop over shoulders.
4. Shield, Spear, Helmet = Athena, Goddess of Warfare Shield: Find a large plastic platter or cut a circle out of foam board. Glue on a handle made of foam board or cardboard; color with gold spray paint. Spear: Use a broom handle or dowel and color with gold spray paint. Draw a spearhead on craft foam. cut out two spearheads from the craft foam. Glue the craft foam together at the edges, and slide the broom handle into the pocket formed by the two pieces. Helmet: Purchase gladiator-style helmet at a costume or party store; color with gold paint OR get creative with craft foam and hot glue to make your own!
4. Shield, Spear/Sword = Hercules or Achilles, Hero of the Trojan War Shield and Spear: Follow steps above for Athena.
6. Gold Tiara/Crown, Veil = Hera, Goddess of Marriage and wife of Zeus Tiara/Crown: Make a crown out of poster board; color with gold spray paint. Veil: Take a piece of sheer fabric or leftovers from your chiton; attach to tiara/crown with staples.
7. Roses and Scallop Shells = Aphrodite, Goddess of Love Roses: Purchase some fake roses or flowers from a thrift store; color them with gold spray paint. Scallop Shells: Draw some shells on poster board; color with gold spray paint and add the shells to your flower bouquet.
Need to look up some other characters from Greek mythology? Check out this list on Wikipedia for more ideas.
Who could resist dressing up when going to “Avatar: The Exhibition“! Since it was December, dressing up as Dr. Grace Augustine (Na’vi version) seemed like a more practical option in order to stay warm. Here are some tips for doing this costume:
1. Get dressed in your tank top and pants. If you’re planning to wear shorts and paint your legs, leave your shorts off and just carefully pull them on at the end.
2. Paint a layer of light blue all over the exposed areas. Don’t paint your hands yet.
3. Using the dark blue side of the combo cake, paint stripes on your face and arms. Allow the stripes to be a bit uneven and jagged, they’ll look more realistic this way.
4. Using the light blue side of the combo cake, paint a thin stripe down the center of each dark blue stripe. This will help give it more dimension and depth.
5. Using the white cake, paint small white dots while following the edges of the blue stripes.
6. Put on your wig, necklaces, and remaining clothes.
7. Paint your hands. Then spray yourself with fixative spray to help seal in the paint.


 Need Maleficent horns ASAP for Halloween? Here’s how I made a headpiece, inspired by the 2014 movie version of Maleficent. I made these pretty quickly so the process isn’t documented as well as I would have liked, but hopefully you’ll find some useful tidbits!
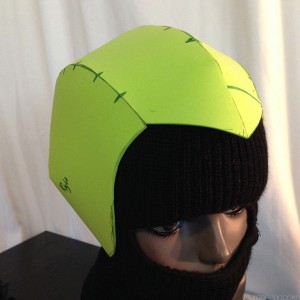 I learned out to make this helmet from Evil Ted Smith’s
 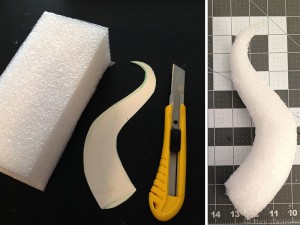 Draw a horn shape on paper. If you need a template, check out my
 Use scissors or a box cutter to shape the horns, as if you are whittling a piece of wood. As you work on the second horn, compare it to the first one to be sure they are the same shape.
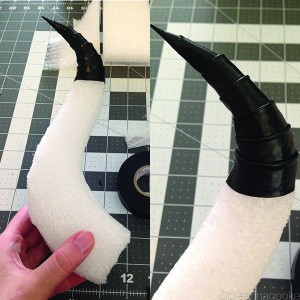 I used
  Use contact cement to apply the fabric to the front and fold it under the front edge.
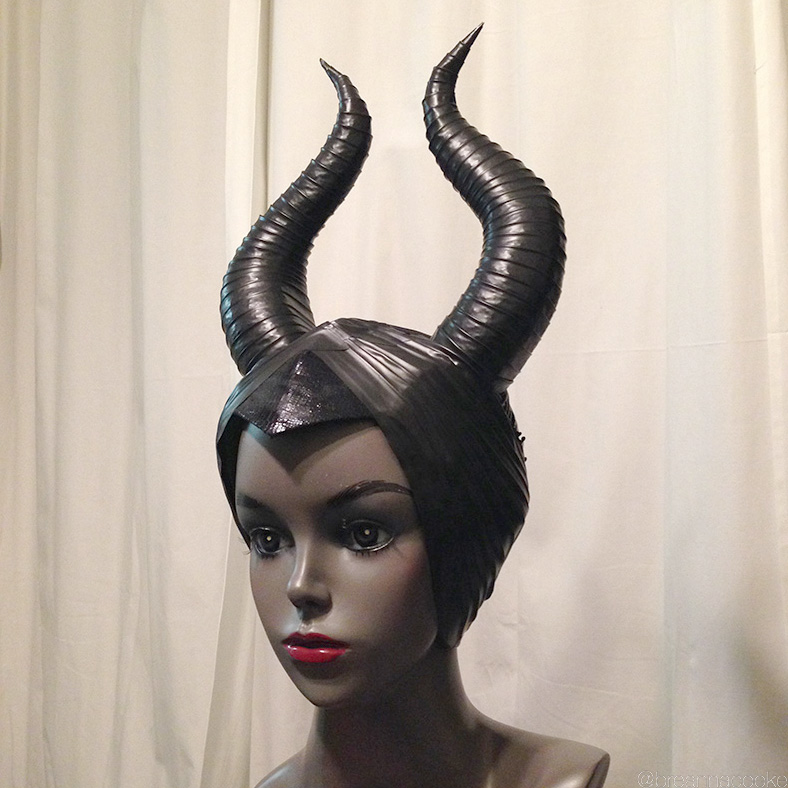


 Artists have 6.5 hours to paint a model (with the help of an assistant if you have one). Then we each have 1.5 minutes to present our creations to a panel of judges. After the judging, there is opportunity for photos and then an evening runway show. Artists can select music and prepare a statement to be read by the MC while their model walks/dances/twirls down the runway for 2 minutes. It’s the most amazing spectacle of art!


