To help raise funds for DFW Refugee Families, I did henna-like bodypainting at Bollywood-themed party. Check out some of the painted hands!


To help raise funds for DFW Refugee Families, I did henna-like bodypainting at Bollywood-themed party. Check out some of the painted hands!

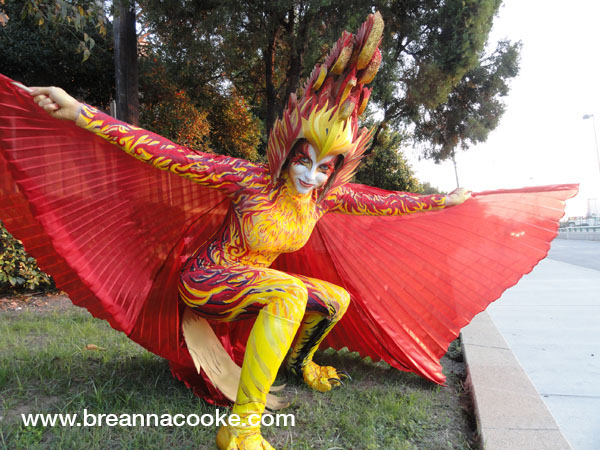
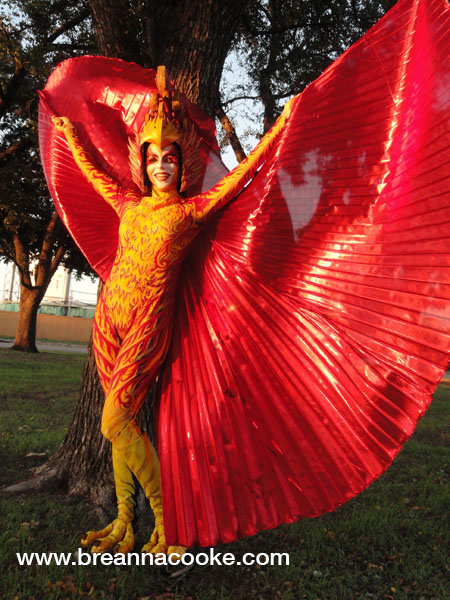
My Halloween costume was a mythological phoenix, the colorful red and gold bird that bursts into flames and is reborn from its own ashes. This costume consumed all my free time in September and October, but I’m really pleased with the result! I’ve posted these instructions on Instructables.com too!


– 1 white full body unitard (Bal Togs brand)
– Jaquard brand fabric paints – 2.25fl oz size
– Lumiere line (2 crimson, 2 gold, 2 burgundy, 1 burnt orange)
– Neopaque line (2 yellow, 2 gold yellow, 2 red, 1 black)
– paint brushes
– 1 iron (for heat setting)
– 1 mannequin to hold your bodysuit’s shape
Plan out your design, then start painting! This design took me at least 40 hours to complete. Having a mannequin is crucial for holding the body suit in the stretched position. The body suit is made primarily from nylon, so I chose Jaquard paints because they were one of the few that list nylon as a suitable base. If your body suit is made from a different fabric, you may want to investigate a different brand of paint or do a test sample. After the body suit is dry, flip it all inside out and iron it with the correct setting for the fabric. I placed towels in the legs and arms so the designs weren’t pressed together under the heat.


Using craft glue, stick together pieces of foam so that they are wide enough for a toe (about 3 inches wide). Shape the foam with scissors so that it is rounded and toe-like (repeat 5 more times). Cut out an insert for the claw, but don’t glue the claw in yet. Paint the green foam with acrylic paint so it matches the boots. Using the foam brushes, paint the toes and boots with liquid latex. Be sure to follow the instructions on the liquid latex. Once the latex is dry, glue in the claws. Then paint the boots to match your costume. I used fabric paints since they would match the body suit even though they’re not the perfect paint for sticking to latex (and I’m not sure what is).


Create paper patterns of each spiral piece and cut them out of polyethylene foam. Glue the pieces together with hot glue so that the flat sides are together and there’s a space for your head. It’s almost like making a helmet. Cut out pieces of the thin craft foam for the beak and side “feathers” and glue on with hot glue. Give the entire headpiece a base coat with spray paint, then add accents of color with acrylic paint and any leftover fabric paint.
– 1 pair of Isis belly dance wings (available online)

– Face and body paint – Paradise, FAB, and Kryolan water-based cakes
– paint brushes
With water-based face/body paints, dip your brush in water and rub it on the surface of the dry cake until the paint is a smooth and creamy consistency. Now paint your face however you wish! I don’t have any process photos of this part, so you get to be creative!
One of the common questions with body paint is: Will it rub off?
And in general, the answer is: Yes, it will eventually rub off. BUT, that said, there are some products available to help seal on your paint and make it last longer.
Below are some of the products I use. There are other products out there, these are just ones that I have experience with. All are available at SillyFarm.com:
Ben Nye LiquiSet – Use it instead of water to activate the paints and it will help seal on the paint. I’ve found this to be slightly sticky/tacky when it’s dry…which I guess is why it helps “stick” the paint on.
Ben Nye Final Set – Put it in a spritzing bottle and spray yourself when you’re all done painting. Let it dry before you touch it!!
Kryolan Fixer Spray – Looks like a bottle of hairspray and it essentially works the same way. Just spray all over the paint when you’re done.
Some Lessons I’ve Learned…
Happy Painting!

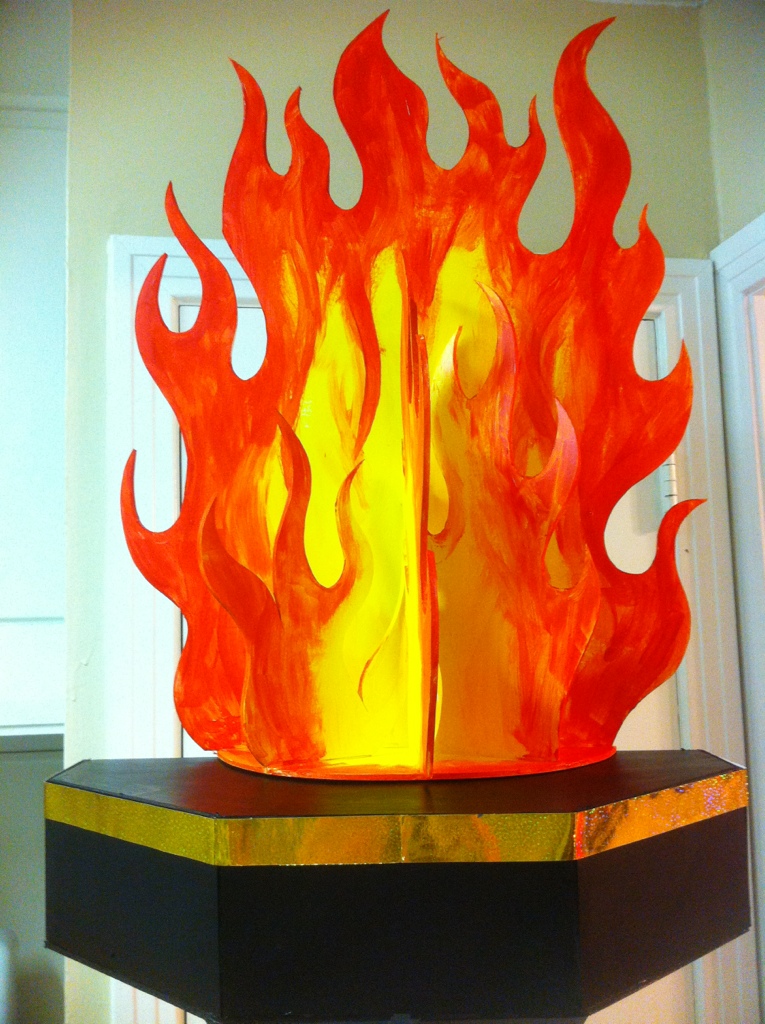
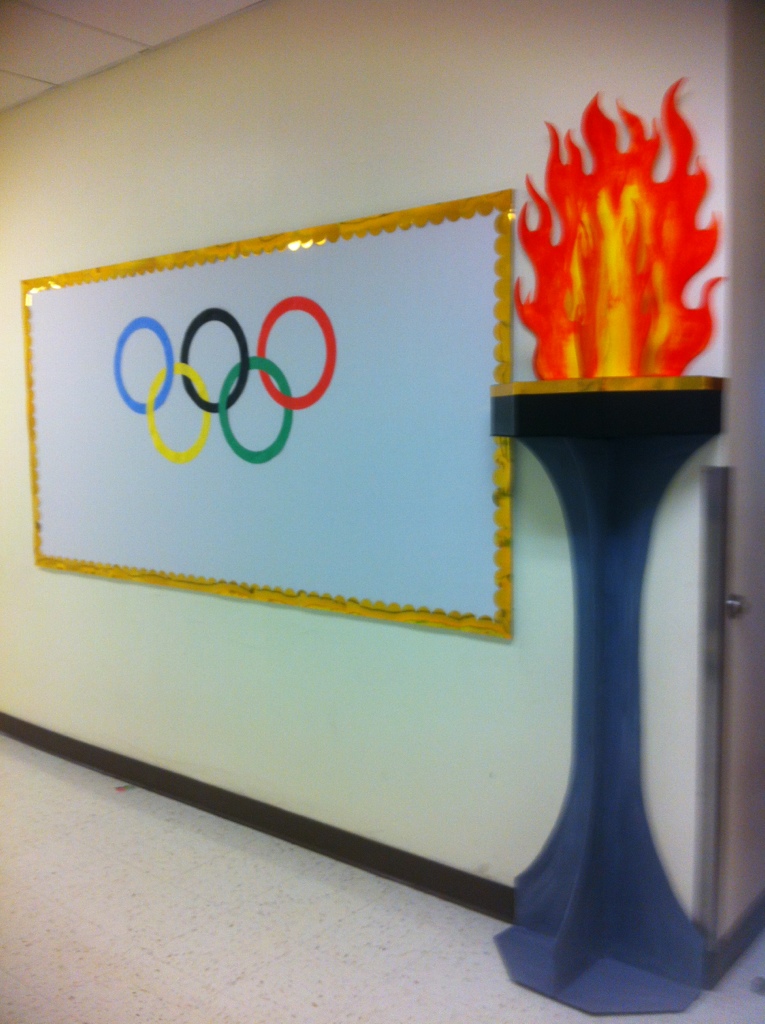
I recently made an Olympic torch/cauldron for my friend’s Olympic-themed classroom. It took about 6 hours to make. It it freestanding, but we attached it to the wall so it wouldn’t get bumped over, it was pretty lightweight
Despite the size. I designed the torch pattern myself and it’s made from foamboard, hot glue, and paint. That’s it!


I had my paints out at an “Arabian Nights”-themed party and painted the night away! I painted 22 people over the course of the evening, but as usual, I started forgetting to snap photos of each one. I’m glad I created the boards of design options, it really helped give people direction. All of the designs done with brush and sponge.


HARPY: Classical Mythology . a ravenous, filthy monster having a woman’s head and a bird’s body.
Below are some instructions on what I did to accomplish this harpy costume for Halloween 2011.
I first started out with a sketch based on some good ol’ Googling of harpies. I particularly liked the ones in World of Warcraft. As you can see, my final product evolved a bit differently from the sketch (colored wings became a bit too time consuming):

The frame is the most critical part to having awesome wings. I commissioned the help of an expert in wing-making, Danielle Hurley. Her craftsmanship is top-notch and the frame fit me perfectly. I’d highly recommend contacting her if you’d like some wings. Check out more of her work on her website or her blog.
To support the feathers, I made a frame from chicken wire and glued it onto some black canvas.


I used black turkey quills and started applying from the bottom up. I ordered 500 feathers (250 of each wing side) and probably used about 300-350. I also used bits of black down from a feather boa to mask the transition of quills at the top of the wings.


I built my bird feet on top of an existing pair of boots that I knew were comfortable. It helped that they already had pointed toes. I used green craft foam to shape the toes and hot-glued them on. The talons are fake bear claws. The bear claws were more proportional to my body than fake eagle talons.


I painted the green foam with brown paint so it would all match. Then I covered the boots in tan liquid latex. In hindsight, this may not have been the best material, but it gave it the rubbery skin-like texture I wanted.
I painted the final boots with acrylic paints (again, maybe not the best type of paint since it kept cracking).

I painted myself with professional grade body paint using a sponge and brush. I usually use the water activated cakes from the Paradise line by Mehron since I can buy them locally at Norcosto in Dallas. I also order online from Silly Farm when I have more time to spare.

The fangs were from a Halloween shop. I recommend going for the most realistic ones, even if they cost more. The nails were also from the costume shop and glued on with nail glue.


 This painting was created as a birthday present for a musical friend. Above is the finished product and below are some of the process images. The painting was done on scrap particle board with Liquitex Acrylic paints.
[slideshow]
Apparently blue is my color!
This year’s costume was Neytiri from Avatar. I decided to use body paint instead of liquid latex like my Mystique costume last year. I did the majority of painting myself, though I needed help with my back. Here is the final result, but keep scrolling down if you’d like to see more photos of the process. The professional photos are courtesy of T.J. Hall Photography.


I purchased a “Pandora Kit” from SillyFarm.com. The kit included all the blues I needed, and it worked perfectly for painting a full body. I also purchased some glow-in-the-dark body paint so that the white dots would glow.
1. Apply the light blue all over your body with a sponge.

2. Use the 2-blue combo cake (it should be shimmery) for the stripes. Start by painting stripes with the dark blue, then add a highlight with the light blue right on top of the dark one.

3. Use white is for adding the dots, then go over them again with glow paint (optional).
UPDATE 10/10/2012: Check out my tips on how to seal water-based body paint. This will help prevent your paint from rubbing off on everything.
I made the beaded arm bands by painting Mardi Gras beads and sewing them onto elastic bands.
I purchased the wig online. If you search for “Deluxe Neytiri wig with ears” you’ll find the same wig from various vendors. I also glued some feathers into the braids to make it fuller and match Neytiri.

I made the outfit from scraps of fabric and a bikini bra top from the fabric store. I made the straps by braiding fabric and I stitched fabric on to the front of the bra cups by hand. The loincloth (not pictured) was two rectangles of fabric sewn on to a pair of black underwear.
Ok, so this isn’t exactly a graphic design or costume project…but there was painting/staining involved, so I guess it counts! I found some great plans for a vegetable planter box on StarkSilverCreek.com. Be sure to check it out if you’re interested in making your own. I submitted my end result and here’s the post on StarkSilverCreek.com featuring my version of the planter box.

I fulfilled my dream, I was Mystique from X-men!… I know, I take Halloween WAY too seriously.
I already have red hair, so that was the easy part. The hard part was painting my body with liquid latex! I’ve outlined some thoughts on applying liquid latex, so keep scrolling on down!


I researched a bunch of Mystique images and I opted to follow the face and hair of the movie version.

And I followed the clothes and body of the comic book version.

This was my first time buying liquid latex. I purchased liquid latex from www.liquidlatex.com and this was my order:

To make the scales on my face I cut out pieces of blue craft foam and stuck them onto my face with liquid latex. Then I painted over the scales with liquid latex.


