Category: supplies

Closeup photo of shipping envelopes from EcoEnclose with logo stamped on.

Eco-Friendly Shipping and Packaging Supplies for Small Business

Sustainable shipping and packaging options are getting easier find and I’m here to share what I use! There’s no denying that eco-friendly supplies cost a little bit more. But for me, the extra cost is worth it in order to minimize the environmental impact of my art. Read on for some of the paper and envelope options I use.

This post contains affiliate links. That means I receive a small commission (at no extra cost to you) if you make a purchase after clicking the link.

#1 Postcards Printed on Recycled Paper from GotPrint

Postcards from GotPrint sitting on table with eco-friendly shipping envelopes.
Postcards from GotPrint printed with soy-based inks on recycled paper.

I’ve printed with GotPrint since about 2007, they have been my go-to option for a while. They have some of the best pricing, plus they also offer recycled paper. My thank you card inserts are GotPrint’s 4x6in postcards printed on 100lb recycled cover stock. Plus they print with soy-based inks! I recommend ordering one of their paper sample kits. It gives you a good idea of paper weights and sizes to more effectively plan other print pieces.

#2 Shipping Envelopes from EcoEnclose

Brown paper shipping envelopes from EcoEnclose

I have a variety of envelope sizes from EcoEnclose‘s 100% recycled mailer options. I recommend ordering some free samples to get a sense of what will work best for your needs before making a large order. Their website has lots of resources to help you understand the best options based on your goals and needs. My goal was to focus on biodegradable mailers whenever feasible, so most of my options are are from their paper options. Click this referral link to get $20 off your first order with EcoEnclose!

#3 Rubber Stamp with Soy-Based Ink from Noissue

Closeup of rubber stamp with Breanna Cooke's logo

The rubber stamp from Noissue is perfect for stamping your brand on paper products. The manual version (what I have) is made from FSC Certified wood and synthetic rubber and the inkpad is soy-based ink. The self-inking version is made from 65% post-consumer plastics. Noissue also offers a variety of eco-minded packaging options.

#4 Stickers Printed on Recycled Paper from Online Labels

Close up of white circle sticker that read "thank you." The sticker seals the back of an envelope.

My “thank you” stickers are the 1.5 inch circle labels printed on recycled white from OnlineLabels.com. There are 30 labels to an 8.5×11 sheet. I like that you can also order blank label sheets that work with home printers. This is also where I order the jar labels for my bioglitter!

#5 Water Activated Paper Shipping Tape from EcoEnclose

Closeup photo of water-activated paper shipping tape from EcoEnclose

All of my mailers have a self-sealing adhesive strip, however the larger apparel mailers from EcoEnclose get a little lumpy when they’re packed, so the adhesive strip doesn’t have the best grip points. I like to add the extra security of packing tape over the self-sealing flap. Water-activated paper tape works the easiest with the dispensers that wet the tape. However, if you’re like me, you might not have one of those dispensers yet! A wet sponge works just as well and for me, it’s a minor inconvenience in order to use more sustainable tape. Click this referral link to get $20 off your first order with EcoEnclose!

Biodegradable Glitter Mixes in Gold and Silver by Breanna Cooke

Biodegradable Gold and Silver Glitter Mixes By Breanna Cooke

Glitter up while being gentler to the planet with my new shimmery gold or silver eucalyptus-based glitter mixes!

I’ve been using bio glitter in my body paint work for a few years now and I kept making my own custom mixes for my work. People would ask me where I got them and I had to explain that I got glitter from a few different vendors. But not anymore: I’ve made my favorite bio glitter mixes to share with you!

The biodegradable glitter mixes are a blend of plant-based compostable glitters. The mixes are a blend of cosmetic-grade 92% and 100% plastic-free glitter. Once my current stock is used up, I hope to shift my mixes to be Bio-glitter’s line of all 100% plastic-free glitter.

To make these as eco-friendly as possible, they are packed in glass jars and labeled with stickers made from recycled content. I also ship them in biodegradable packaging.

There are two color mixes available:

1. Iridescent Gold: Mix of gold and opalescent glitters in .005, .040, and .094 hexagonal cut glitter.

Biodegradable Glitter mix in iridescent gold for body painting and face painting and festivals.

2. Iridescent Silver: Mix of silver and opalescent glitters in .005, .040, and .094 hexagonal cut glitter.

Biodegradable Glitter mix in iridescent silver for body painting and face painting and festivals.

About this glitter:

  • 92% plastic-free (some in the mix are 100% plastic-free)
  • Cosmetic-grade
  • Allergen-free
  • Cruelty-free
  • Toxic-free

Order my iridescent gold or iridescent silver mixes in my online store:

SHOP NOW

Need another color?

If there’s a specific color you need, check out my partners at Today Glitter. They are a certified vendor of Bio-glitter.

6 Tips to Make Your Body Paint Kit More Eco-Friendly with photos of bio glitter, bamboo paper towels, and reused containers.

6 Tips to Make Your Body Paint Kit More Eco-Friendly

Over the last few years, I’ve been working on small changes to my body paint kit to make my work a little more eco-friendly. I hope to keep improving on this list, so read on to see if some of these ideas are a good fit for you! (For a general list of all my various art, website, and supply resources, visit my Resources page or read this blog post about the paints I use for body painting.)

Quick disclaimer: Some of the links in this post are referral links, and at no additional cost to you, I’ll receive a small commission for referring you. This helps me continue doing what I do! These are all products that I have experience with or use personally. 

#1. Switch to biodegradable glitter

Bio Glitter | Tips to Make Your Body Paint Kit More Eco FriendlyWhile it’s crucial to use cosmetic glitter in body and face painting (don’t use craft glitter on your face because it often has sharp edges or metal!), some cosmetic glitter is still considered a micro-plastic. Micro-plastics have become a huge pollution issue as they make their way into our waterways and oceans and are ingested by fish and other organisms. In order to reduce the number of micro-plastics I send out into the world, I’ve made the switch over to biodegradable glitter. Update 03/10/2021: You can order my custom biodegradable iridescent gold or iridescent silver mixes on Etsy. Or if you need a specific color, I’m a professional partner with Today Glitter, certified vendor of Bio-Glitter.

Biodegradable glitter is made from biodegradable film which is derived from sustainable sources, such as cellulose film made from eucalyptus trees.  It’s completely shelf stable and the degradation process will only begin in soil, waste water or compost where micro-organisms are present. Bio glitter suited for dry, water-based, or oil-based applications. There are  bio glitters available from different vendors and I’m currently trying to use options that are available in the US to reduce the shipping distance for the small quantities I use. I apply the glitter with Got2b Glued Hair Gel or aloe vera gel.

#2. Use paper towels made from bamboo

Paper towels are often necessary to have around in order to keep makeup and body paint application and cleanup sanitary. I’ve switched over to using bamboo paper towels from Who Gives a Crap because bamboo is a much more sustainable resource than using trees. I also like that the rolls from Who Gives a Crap are wrapped in paper, not plastic, plus they also donate 50% of profits to build toilets for those in need. (Speaking of toilets: if you try their toilet paper, I prefer the premium bamboo toilet paper over the recycled paper. It’s a little less…errr…lint-y).

Save $10 on your first order from Who Gives a Crap!

#3. Recycle empty cosmetics at Credo Beauty

I always keep a few makeup staples in my body paint kit like mascara, foundation, or lip gloss. I’ve been testing out a lot of eco-friendly and recyclable replacements, but for some products, I haven’t found the perfect match (yet) of product durability + sustainable packaging. So in the meantime, I recycle the old beauty products at Credo Beauty. They’ll even take products that aren’t from Credo PLUS you get reward points for every full size item you bring in. Credo has partnered with TerraCycle, an environmentally-friendly recycling program, to help keep cosmetics out of our landfills. To recycle your items, bring them to your local Credo store.

#4. Cut cleaning cloths from t-shirts

Not all cleaning tasks require a paper towel. For cleaning the paint off my airbrushes and stencils, I use cleaning cloths that I’ve made from t-shirts. A lot of clothing ends up in landfill despite our best intentions to donate them. I love giving my clothes a second life as a cleaning cloth. I do recommend getting a good pair of fabric shears (I have these Mundial Cushion scissors and only use them on fabric). It makes cutting up clothes go so much faster.

#5. Reuse paint bottles and cases

I like to reuse my empty paint cases first before I recycle them. While recycling is an important component to being eco-friendly, I try to start first with the “Reuse” part of the “Reduce, Reuse, Recycle” saying. The lids from paint cakes are great for holding loose powder or glitter when I’m powdering it all over a body. When I’ve used up all the paint in a container, I clean them out and use them as a dish for mixing Mehron Metallic Powders and Mehron Mixing Liquid. When my ProAiir hybrid airbrush paint bottles are empty, I rinse them with 91% alcohol and keep them in case I need to mix a custom color or I need to share paint with a colleague.

#6. Use cotton swabs with cardboard sticks

Cotton swabs are another necessary item for sanitary makeup application, especially for glue application or doing a touch-up near someone’s eyes. I look for ones with cardboard sticks so that they eventually biodegrade. If you haven’t seen that heartbreaking image of the seahorse in the ocean holding on to a plastic cotton swab, you can view it here on National Geographic. It definitely made me rethink the need for the single-use plastic in cotton swabs.

Do you have any eco-friendly tips for your kit? Let me know in the comments!

breanna cooke body painting

Paints I Use for Body Painting

Which paints do I use? It depends! I use different paints based on availability and my project’s needs. Below are some products that I use most frequently. For a general list of all my various art, website, and supply resources, visit my Resources page.

Quick disclaimer: I do not speak for all body painters, everyone has their own preferences for various reasons. I’m listing products that I have personal experience with. I am also not representing any of these companies and I also can’t vouch for how any of the products will work for you and your process. That said, some of the links in this post are affiliate links from Amazon and the like, and at no additional cost to you, I’ll receive a small commission for referring you. This helps me continue doing what I do!

Shop Local: While ordering online is often necessary, I also like to support local businesses whenever possible. If you live in Dallas, TX, you can purchase some of these products locally at Camera Ready Cosmetics (order online then pickup in store, too) or Norcostco Theatrical Supply.

Water-Based Body Paints


Cameleon: The eye-popping colors first drew me to Cameleon paints (no, that’s not a typo in Cameleon). I love the opacity and they’re great for line work too. The baseline Cameleon paints are free of any animal origin ingredients, are BSE free, and are not tested on animals. They are glycerin-based and use paraffin wax as a binder. Cameleon Paint is FDA and EU Compliant and is paraben-free, sulfate-free, with no perfumes and no drying agents. I typically use these (and the other cake paints listed below) with a brush and occasionally a sponge. Cameleon paints are not available locally in Dallas but you can find even more colors from their US distributor.

Mehron Paradise AQ: When I first got into body painting, I started with Mehron Paradise cakes. They are lovely for blending and once they’re activated with water they have a creamy consistency. Mehron Paradise AQ is vegan and is not tested on animals and is unscented. If you want to try a lot of colors in small quantities, check out the Mehron Pro Face Paint Palette with 30 colors. Mehron Paradise cakes are available in Dallas at Camera Ready Cosmetics or Norcostco Theatrical Supply.

Wolfe FX: I primarily use the Wolfe FX white and black because they are excellent for bold line work, but sometimes they are hard to find in stock. I’ve used TAG black and TAG white, or Cameleon black and Cameleon white as an alternative. Diamond FX black and Diamond FX white are also good options but I have limited experience with them. Wolfe FX paints are sometimes available locally at Norcostco Theatrical Supply, otherwise I order them online.


Hybrid and Alcohol-Based Body Paints


Hybrid Paints: I like to use ProAiir and FAB hybrid paints because they’re great for vibrant colors and opacity. You can get a lot of coverage very quickly with them. Plus they are water-resistant and sweat-resistant, so they’ll hold up for an underwater photoshoot or an acrobatic performance. Some of my favorite colors are the ProAiir electric blue and cobalt. For some extra staying power, I seal it with ProAiir Prolong Extender. Hybrid paints are made with 100% cosmetic blend alcohol (same alcohol that is used in hair sprays, mouth wash, eyeliner, etc.). The ProAiir paints are made in the USA and are scented (similar to green apple scent). I usually use an Iwata Eclipse CS airbrush to apply ProAiir, however you can also use a sponge or kabuki brush to apply to large areas. When I use my Iwata bottle-feed airbrush, I often use the ProAiir Snorkel Adaptors to connect directly to the bottle of paint. ProAiir is available locally in Dallas at Norcostco.

Alcohol-Based PaintsThe Endura paints from European Body Art (EBA) are my other go-to for long-lasting airbrush paints. These alcohol-based paints are water- and sweat-resistant and work best with an airbrush. I personally tend to use them for more subtle effects or lighter coverage but you can also build them up. I apply these paints with an Iwata Eclipse CS airbrush or an Iwata bottle-feed airbrush. EBA paints are available locally in Dallas at Norcostco.


Glitter and Metallic Body Paint


Glitter: I’ve switched over to biodegradable glitter and feels good to have more environmentally-friendly products in my kit. I’ve ordered bio glitter from Amerikan Body Art in Florida, Body FX in New Zealand (available in the US from Silly Farm) and from Universal Soul in Los Angeles. The Bio Glitter from Body FX is produced from biodegradable film which is derived from sustainable sources and Universal Soul’s glitter is made with cellulose film derived from eucalyptus trees.  It’s completely shelf stable and the degradation process will only begin in soil, waste water or compost where micro-organisms are present. They’re both suited for dry, water-based, or oil-based applications. While it’s crucial to use cosmetic glitter in body painting (don’t use craft glitter on your face!), some cosmetic glitter is still considered a micro-plastic and doesn’t biodegrade once it goes down the drain. It can make its way into our waterways and oceans and get ingested by fish and other organisms. There are quite a few bio glitters available from different vendors and I’m currently trying to use options that are available in the US to reduce the shipping distance for the small quantities I use.

Metallic Effects: The Mehron Metallic Powders are my go-to for a cost-effective full body paint metallic finish. You can find these in gold, silver, rose gold, copper, bronze, and lavender. Be sure to purchase Mehron Mixing Liquid to mix into the powder. Mix small amounts of the Mehron powder with Mehron Mixing liquid and brush it over the body. For a more yellow gold, I’ve brushed on a gold Mehron Paradise cake (the product photo looks a bit like tan, but it is really a more yellow gold) or gold Cameleon cake, then applied a gold shimmer powder from Ben Nye. The Mehron and Ben Nye products are usually available locally in Dallas, TX at Norcostco Theatrical Supply.


Body Paint for Specific Looks


Avatar: For my personal Avatar body paint costumes, I used the Kryolan Aquacolor in baby blue for the base coat. For the stripes, I used the Avatar Rainbow Cake from Silly Farm. It has a dark blue and a light blue side. I use the darker blue for the stripes, then I add a highlight on top of the stripe with the lighter blue. For the white dots, I use Wolfe FX whiteCameleon white, or TAG white.

Making a Maleficent Collar and Cloak

Breanna Cooke Maleficent costume - Photo by Alan Tijerina Photography
Photo by Alan Tijerina Photography

Last Friday I won the Saturday ticket giveaway from the Irving Convention Center for Dallas Comic Con Fan Days! I was so excited, but I didn’t have a new costume finished…and how could I go to Fan Days without dressing up?!  I already had Maleficent horns from a previous project, so I took on the challenge of making a Maleficent collar and cloak in one night. Below are some of my behind-the-scenes photos of my late night crafting.

Collar

Breanna Cooke Maleficent costume collar DIY I got some great ideas from this DIY Maleficent tutorial by Pins and Things. She used cardboard and wire to hold the collar upright. I opted for craft foam, hot glue and wire as the core for my collar. I sandwiched the wire between a layer of craft foam. Then I sewed fabric sleeves for each section, pulled it over the craft foam, and sewed up the open end.

Attaching the Collar

Breanna Cooke Maleficent costume collar DIYThe robe for my costume wasn’t going to support the weight of the collar, so I made a base from EVA foam (you can use those interlocking anti-fatigue floor mats, visit my Resources page for where to buy it). Now the whole collar would be a solid, removable piece from the robe. I shaped the EVA foam with a heat gun and made a fabric sleeve for it in the same way I made the collar sleeves. I hot glued and sewed the individual collar pieces to this foam/fabric base, then loosely stitched it to the robe.

Enhancing the Collar

Breanna Cooke Maleficent costume collar DIY
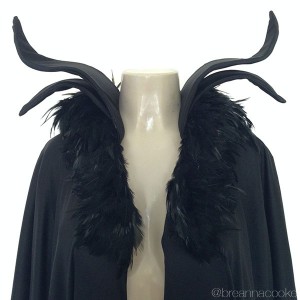
In the recent Maleficent movie, she has a cloak with the iconic pointy collar and a cloak with a feather collar. I took the best of both and added the feathers to mine. I used a section of black hackle feather trim (check Michael’s or Hobby Lobby) and glued it to the collar base with hot glue.

Cloak

Breanna Cooke Maleficent costume cloak DIYI never thought I’d find a use for my graduation gown, but tada! It provided a great base for the Maleficent robe. I purchased 4 yards of black polyester, cut a hole in the middle, and draped it over the robe like a poncho. I sewed the sides of the fabric “poncho” and left room for armholes, then cut open the front and stitched the fabric to the collar of the gown. If I’d had more time, I would have loved to make a really elegant cloak from scratch. Maybe next time!

Horns

Breanna Cooke Maleficent horns DIY with craft foam and electrical tapeAnd don’t forget the horns! Check out my other post with details about how I made my Maleficent horns. They’re made with reticulated foam, craft foam and electrical tape!  

Face

Breanna Cooke Maleficent makeupI used a variety of products to create the Maleficent face. I love the purple accents in the cartoon version of Maleficent, so my makeup was a mashup of both Maleficent looks.

  • Eyes: light and dark purple eye shadow (shown on my hand in the photo)
  • Eyebrows: Wolfe FX Hydrocolor cake in black
  • Face: Airbrushed with European Body Art Endura airbrush paint in white and black. Contours with grey eye shadow.
  • Lips: Vincent Longo lipstick in “Lust” (not shown)


commander

Breanna Cooke Flying Monkey at Dallas Museum of Art Late Night

When the Dallas Museum of Art hosted a Wizard of Oz-themed Late Night event, I couldn’t resist making a Flying Monkey costume with my own twist! I already had the black feathered wings, so I just needed to make the outfit. Below are some behind-the-scenes photos of how I put it all together:

1. Hat

Flying Monkey Hat from Wizard of Oz by Breanna Cooke

The hat is made from a Laughing Cow Cheese container, craft foam, and cotton fabric. Unfortunately I didn’t document it well while I was working on it. The side of the hat is craft foam covered in fabric. I used spray glue (Super 77) to glue the fabric to the craft foam. I drew the zigzag design on paper, then traced it on the red, white, and black fabric, and made each one slightly larger than the last. The zigzag pieces of fabric were also glued with spray glue. I also added a chin strap with thin elastic, like the elastic on party hats.

Materials:

  • Laughing Cow Cheese container (empty)
  • Craft foam
  • Cotton Fabric: light blue, red, white, black
  • Spray Glue (Super 77)

2. Wig

Flying Monkey Wig from Wizard of Oz by Breanna Cooke

The wig started out as a weird Moses/Zeus wig from Party City. I didn’t have enough time to order anything online, so I used what I could buy locally. Armed with scissors, I slowly cut away at it to give it the signature widow’s peak of the monkeys (and most simians) in the 1939 edition of Wizard of Oz. I had my doubts at first but I’m really pleased with how it turned out.

Materials:

  • Grey wig
  • Scissors
  • Head form

3. Jacket

Flying Monkey Jacket from Wizard of Oz by Breanna Cooke

I created a paper pattern for the jacket based on reference photos and an existing fleece vest I own. Using plain cotton fabric in light blue, red, white, and black, I cut out all the layers to create the zigzag pattern and jacket base. I glued the zigzag layers together with spray glue (Super 77), attached it to the blue part of the jacket, and added interfacing to give the whole jacket the structured shape. I also added slits in the back of the jacket (not shown) for my wings to poke out.

Materials:

  • Cotton Fabric: Light blue, red, white, black – measure the amount you need based on your paper patterns and don’t forget about the hat!
  • Interfacing

4. Bodysuit

Flying Monkey from Wizard of Oz - Bodysuit - by Breanna Cooke

This costume, like my dragon costume, features a hand-dyed and painted bodysuit. I first tested the dye on a scrap of Lycra (1st image). I used Jacquard’s Dye-na-flow black, watered it down, added a few drops of Jacquard’s AirFix, and brushed the dye onto the bodysuit. Once it was dry, I painted on the fur with Jacquard’s Neopaque and Lumiere fabric paints.

Materials:

  • 1 white Bal Togs body suit
  • 1 bottle Jacquard Dye-na-flow black
  • 1 bottle Jacquard AirFix
  • Jacquard Fabric Paints: Black and White (Neopaque), Pewter and Pearlescent Blue (Lumiere)
  • Paint brushes

5. Feet

Flying Monkey from Wizard of Oz - Feet - by Breanna Cooke

I wanted to look like I was barefoot without actually being barefoot! Using some white socks (synthetic fabric), I stuffed them with polyfill, then dyed and painted them with fabric paints (same as used on bodysuit). I applied Zombie Skin (a creamy latex) to the toes to reinforce the toe area. I pulled the stuffing out of the socks, added some foam insoles, then cut out holes for each my toes. When I wear the costume, I paint my toes with same blue bodypaint I use for the face (see #7).

Materials:

  • White Socks (synthetic fabric, like liner socks)
  • Zombie Skin (latex)
  • Polyfill (or rags to stuff inside)
  • Fabric paints and dyes (see #4 Bodysuit)

6. Wings

Flying Monkey from Wizard of Oz - wings - by Breanna Cooke

I made these wings a few years ago for my Harpy costume but they worked well for my monkey costume too. The frame was commissioned from Danielle Hurley and she does amazing work! I used chicken wire as the frame for the wings and hot-glued it to black canvas. I hot-glued approximately 350 black turkey feathers for the wings and used down from a black feather boa for the top. Needless to say, these wings are a tad heavy but they are definitely sturdy!

Materials (for the wings, not the frame):

  • Black canvas fabric
  • Chicken wire
  • Gloves and wire cutters
  • Black turkey feathers
  • Black feather boa

7. Face

Flying Monkey from Wizard of Oz - face - by Breanna Cooke

I followed reference photos from the movie so I could capture the big smirk of the monkeys. Since I wasn’t using any prosthetics, I also needed to give the illusion of monkey features with makeup. I painted my nostrils black to make them look wider and added accent lines to widen my nose and mouth. I used professional water-based bodypaint to paint my face, hands, and toes and red lipstick on my lips.

Bodypaints (all water-activated cakes):

I’ve created an Amazon list with most of these products.

Need more guidance on how to choose body paint for your costume? Check out my post “How to choose body paint and makeup for DIY Halloween costumes.”

And there you have it!

Flying Monkey - Photo by Ken Pearson Photography
Photo by Ken Pearson Photography

I’ve also been known to hang around with a certain Wicked Witch of the West (Chelphie Cosplay) at various events. Have a look at photos of our dynamic Oz duo.