My coloring book, “Everyone Colors: Amazing Sea Life,” was featured on Good Morning Texas yesterday! In case you missed it, here’s the video to the full segment where Mike Castellucci and I talk about the growing trend of adult coloring books.
My book started with a fish drawing on an airplane a few months ago. Coloring was on my mind after reading about the resurgence of coloring books and I wished I had something to color on my flight. So I drew something to color in! As I drew more creatures and shared photos, my friends started asking me for a coloring book. So here it is! Order yours today on CreateSpace or Amazon.
Be sure to share pics of your coloring under #EveryoneColors so I can see your amazing work.
Exciting news: My coloring book is also available to order through Amazon!
The books are still printed on-demand, so they’ll ship just as soon as they’re made. If Amazon is where you shop or you’re already ordering something, then nab one of my books there. It’s eligible for free shipping on orders over $35 or Amazon Prime (it will be sent with 2-day shipping after it’s printed)!
Don’t forget to share your coloring and tag #EveryoneColors!
It all started with a fish drawing on an airplane. Coloring was on my mind after reading about adult coloring books and I wished I had something to color on my flight. So I drew something to color in! As I drew more creatures and shared photos, my friends started asking me for a coloring book. And here it is! The books are printed on-demand by CreateSpace, so they’re only printed when you order them. The book is 8 in. x 10 in. and contains 11 illustrations. Each page is blank on the back, so it is easy to display your work when you are finished.
My sea life paintings are finally available to order on Redbubble.com! The crab, octopus, fish, and lobster can’t wait to splash their way over to you.
It all started with a fish drawing on an airplane and evolved into a fun set of art prints. I created the art for the prints with watercolors, colored pencils, and pen. They’re available on cards, prints, phone cases, totes, pouches, pillows, and more! All the orders are printed on-demand by RedBubble. (P.S. Sign up for the RedBubble email list to receive 10% off your first order).
COMING SOON! A coloring book for all ages featuring these drawings! Join my email newsletter for updates: Sign up.
My costume, bodypainting, and graphic design worlds are colliding! I’ve created designs based on my past work and they’re now available printed on leggings. Check them out in my Shop. All orders are processed, manufactured, and shipped through Redbubble.com so they’re only made when you order them. Don’t forget to sign up for the RedBubble mailing list and you’ll save 10% on your first order.
My costume, bodypainting, and graphic design worlds are colliding. I’ve been creating designs based on my past costumes and those designs will soon be available printed on leggings! I also have some new ideas in the works too! You may recognize the design in my test pair (pictured above) from my Fiery Phoenix costume from a few years ago. Now that I’ve seen a test pair I just need to finish a few minor tweaks to the artwork and we’ll be rollin’!
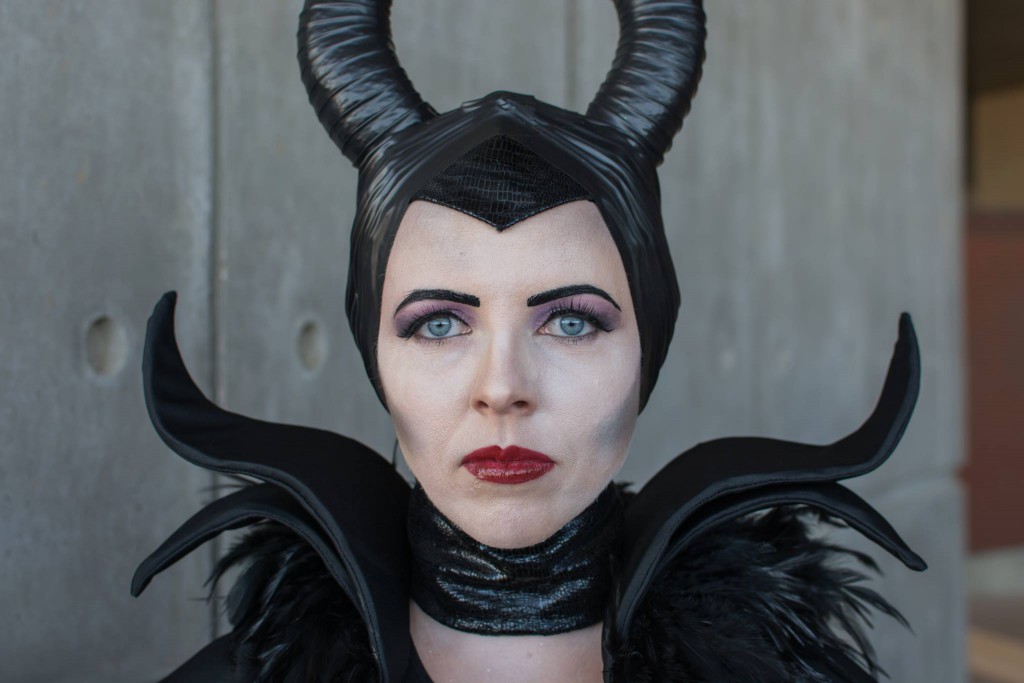
More Maleficent! I had the good fortune of bumping into Alan Tijerina Photography while I was at Dallas Fan Days in February. He captured some great photos of my Maleficent costume on the patio at the Irving Convention Center. And in case you missed it, take a look at my blog posts about how I made my Maleficent collar and horns so you can be Maleficent too!
Photo by Alan TijerinaPhoto by Alan Tijerina PhotographyPhoto by Alan TijerinaPhoto by Alan Tijerina
After sharing this art with my family and friends, I had some requests for prints and cards. And after checking with my family, I decided to share the ordering links more broadly (see below).
This all came about recently when I wanted to send a sympathy card to a grieving friend, but I just wanted to send a card that was simple and sincere. After reading many sympathy cards after my mother’s passing, I noticed that a lot of the pre-printed messages were either very religious or excessively poetic. So I painted this lily and a simple message of love on a card. I later I painted the lily over and over again and realized it was exactly the kind of card I would have wanted to receive. This lily holds special meaning for me as it was the last flower to bloom in a bouquet by my mother’s bedside, right before her passing. It continues to remind me of her love and I hope you can share love with it too.
The original was created with watercolors and colored pencils.
Last Friday I won the Saturday ticket giveaway from the Irving Convention Center for Dallas Comic Con Fan Days! I was so excited, but I didn’t have a new costume finished…and how could I go to Fan Days without dressing up?! I already had Maleficent horns from a previous project, so I took on the challenge of making a Maleficent collar and cloak in one night. Below are some of my behind-the-scenes photos of my late night crafting.
A photo posted by Irving Convention Center (@irvingtxcc) on
Collar
I got some great ideas from this DIY Maleficent tutorial by Pins and Things. She used cardboard and wire to hold the collar upright. I opted for craft foam, hot glue and wire as the core for my collar. I sandwiched the wire between a layer of craft foam. Then I sewed fabric sleeves for each section, pulled it over the craft foam, and sewed up the open end.
Attaching the Collar
The robe for my costume wasn’t going to support the weight of the collar, so I made a base from EVA foam (you can use those interlocking anti-fatigue floor mats, visit my Resources page for where to buy it). Now the whole collar would be a solid, removable piece from the robe. I shaped the EVA foam with a heat gun and made a fabric sleeve for it in the same way I made the collar sleeves. I hot glued and sewed the individual collar pieces to this foam/fabric base, then loosely stitched it to the robe.
Enhancing the Collar
In the recent Maleficent movie, she has a cloak with the iconic pointy collar and a cloak with a feather collar. I took the best of both and added the feathers to mine. I used a section of black hackle feather trim (check Michael’s or Hobby Lobby) and glued it to the collar base with hot glue.
Cloak
I never thought I’d find a use for my graduation gown, but tada! It provided a great base for the Maleficent robe. I purchased 4 yards of black polyester, cut a hole in the middle, and draped it over the robe like a poncho. I sewed the sides of the fabric “poncho” and left room for armholes, then cut open the front and stitched the fabric to the collar of the gown. If I’d had more time, I would have loved to make a really elegant cloak from scratch. Maybe next time!
Horns
And don’t forget the horns! Check out my other post with details about how I made my Maleficent horns. They’re made with reticulated foam, craft foam and electrical tape!
Face
I used a variety of products to create the Maleficent face. I love the purple accents in the cartoon version of Maleficent, so my makeup was a mashup of both Maleficent looks.
Eyes: light and dark purple eye shadow (shown on my hand in the photo)
Eyebrows: Wolfe FX Hydrocolor cake in black
Face: Airbrushed with European Body Art Endura airbrush paint in white and black. Contours with grey eye shadow.
Lips: Vincent Longo lipstick in “Lust” (not shown)
Cookie Consent
We use cookies to improve your experience on our site. By using our site, you consent to cookies.
Websites store cookies to enhance functionality and personalise your experience. You can manage your preferences, but blocking some cookies may impact site performance and services.
Essential cookies enable basic functions and are necessary for the proper function of the website.
Name
Description
Duration
Cookie Preferences
This cookie is used to store the user's cookie consent preferences.
30 days
These cookies are needed for adding comments on this website.
Name
Description
Duration
comment_author
Used to track the user across multiple sessions.
Session
comment_author_email
Used to track the user across multiple sessions.
Session
comment_author_url
Used to track the user across multiple sessions.
Session
Statistics cookies collect information anonymously. This information helps us understand how visitors use our website.
Google Analytics is a powerful tool that tracks and analyzes website traffic for informed marketing decisions.
Contains information related to marketing campaigns of the user. These are shared with Google AdWords / Google Ads when the Google Ads and Google Analytics accounts are linked together.
90 days
__utma
ID used to identify users and sessions
2 years after last activity
__utmt
Used to monitor number of Google Analytics server requests
10 minutes
__utmb
Used to distinguish new sessions and visits. This cookie is set when the GA.js javascript library is loaded and there is no existing __utmb cookie. The cookie is updated every time data is sent to the Google Analytics server.
30 minutes after last activity
__utmc
Used only with old Urchin versions of Google Analytics and not with GA.js. Was used to distinguish between new sessions and visits at the end of a session.
End of session (browser)
__utmz
Contains information about the traffic source or campaign that directed user to the website. The cookie is set when the GA.js javascript is loaded and updated when data is sent to the Google Anaytics server
6 months after last activity
__utmv
Contains custom information set by the web developer via the _setCustomVar method in Google Analytics. This cookie is updated every time new data is sent to the Google Analytics server.
2 years after last activity
__utmx
Used to determine whether a user is included in an A / B or Multivariate test.
18 months
_ga
ID used to identify users
2 years
_gali
Used by Google Analytics to determine which links on a page are being clicked
30 seconds
_ga_
ID used to identify users
2 years
_gid
ID used to identify users for 24 hours after last activity
24 hours
_gat
Used to monitor number of Google Analytics server requests when using Google Tag Manager
1 minute
Marketing cookies are used to follow visitors to websites. The intention is to show ads that are relevant and engaging to the individual user.
A video-sharing platform for users to upload, view, and share videos across various genres and topics.
Registers a unique ID on mobile devices to enable tracking based on geographical GPS location.
1 day
VISITOR_INFO1_LIVE
Tries to estimate the users' bandwidth on pages with integrated YouTube videos. Also used for marketing
179 days
PREF
This cookie stores your preferences and other information, in particular preferred language, how many search results you wish to be shown on your page, and whether or not you wish to have Google’s SafeSearch filter turned on.
10 years from set/ update
YSC
Registers a unique ID to keep statistics of what videos from YouTube the user has seen.
Session
DEVICE_INFO
Used to detect if the visitor has accepted the marketing category in the cookie banner. This cookie is necessary for GDPR-compliance of the website.
179 days
LOGIN_INFO
This cookie is used to play YouTube videos embedded on the website.
2 years
VISITOR_PRIVACY_METADATA
Youtube visitor privacy metadata cookie
180 days
You can find more information in our Cookie Policy and .

 My book started with a fish drawing on an airplane a few months ago. Coloring was on my mind after reading about the resurgence of coloring books and I wished I had something to color on my flight. So I drew something to color in! As I drew more creatures and shared photos, my friends started asking me for a coloring book. So here it is! Order yours today on CreateSpace or Amazon.


 My costume, bodypainting, and graphic design worlds are colliding. I’ve been creating designs based on my past costumes and those designs will soon be available printed on leggings! I also have some new ideas in the works too! You may recognize the design in my test pair (pictured above) from my


 I got some great ideas from this
  The robe for my costume wasn’t going to support the weight of the collar, so I made a base from EVA foam (you can use those interlocking anti-fatigue floor mats, visit my
 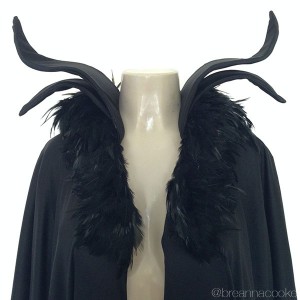 In the recent Maleficent movie, she has a cloak with the iconic pointy collar and a cloak with a feather collar. I took the best of both and added the feathers to mine. I used a section of black hackle feather trim (check Michael’s or Hobby Lobby) and glued it to the collar base with hot glue.
 I never thought I’d find a use for my graduation gown, but tada! It provided a great base for the Maleficent robe. I purchased 4 yards of black polyester, cut a hole in the middle, and draped it over the robe like a poncho. I sewed the sides of the fabric “poncho” and left room for armholes, then cut open the front and stitched the fabric to the collar of the gown. If I’d had more time, I would have loved to make a really elegant cloak from scratch. Maybe next time!
 I used a variety of products to create the Maleficent face. I love the purple accents in the cartoon version of Maleficent, so my makeup was a mashup of both Maleficent looks.