I finally made a Mystic costume from the Dark Crystal! It’s been on my costume wish-list for a long time. There are still a lot of improvements to be made, but I got the costume to a wearable point just in time for the May Dallas Comic Con in 2015. Keep scrolling down to see my process photos.
Mystic Head
1 – Cut foam shapes from Poly Foam;
2 – Sculpted with razors and engraved lines with a soldering iron;
3 – Covered with tissue paper and spray glue;
4 – Brushed on liquid latex from BITY Mold Supply;
5 – Painted with airbrush and various acrylics. Glued on wig and hair segments.
6 – Done! Photo by Alan Tijerina Photography.
Mystic Feet
1 – Pool noodles and pipe insulation carved with razors and utility knife;
2 – Covered with spray glue and white tissue paper;
3 – Brushed on liquid latex from BITY Mold Supply;
4 – Painted with airbrush and various acrylics.
Mystic Hands
1 – Poly foam and pipe insulation carved with razors and utility knife (hat tip to Courtney and Scotty at Zod Fabrication for sharing their raptor hand photos!);
2 – Covered with spray glue and white tissue paper;
3 – Brushed on liquid latex from BITY Mold Supply;
4 – Painted with airbrush and various acrylics.
5 – Attached to costume. My real hands are in the front hands. Photo by Alan Tijerina Photography.
Mystic Body
1 – Poly foam pieces glued with Barge Cement. (I made paper templates before cutting each piece of foam);
2 – More poly foam (looks like an armadillo!). Tail made with a white bedsheet and stuffed with poly filling;
3 – Arms made with pool noodles;
4 – Arms covered with poly foam;
5 – Shirt made from two bedsheets and hand-sewn to fit;
6 – Final costume worn at #DallasFanExpo
Mystic Armor
1 – EVA foam (anti-fatigue mat) for armor pieces. Shaped with heat gun. (I made paper templates before cutting each piece of foam);
2 – Traced each piece of armor in fabric;
3 – Glued fabric to EVA foam with spray glue;
4 – Glued pieces of tan fabric for details, painted with airbrush and various acrylics;
5 – Closeup of bracer;
6 – Final costume worn at #DallasFanExpo
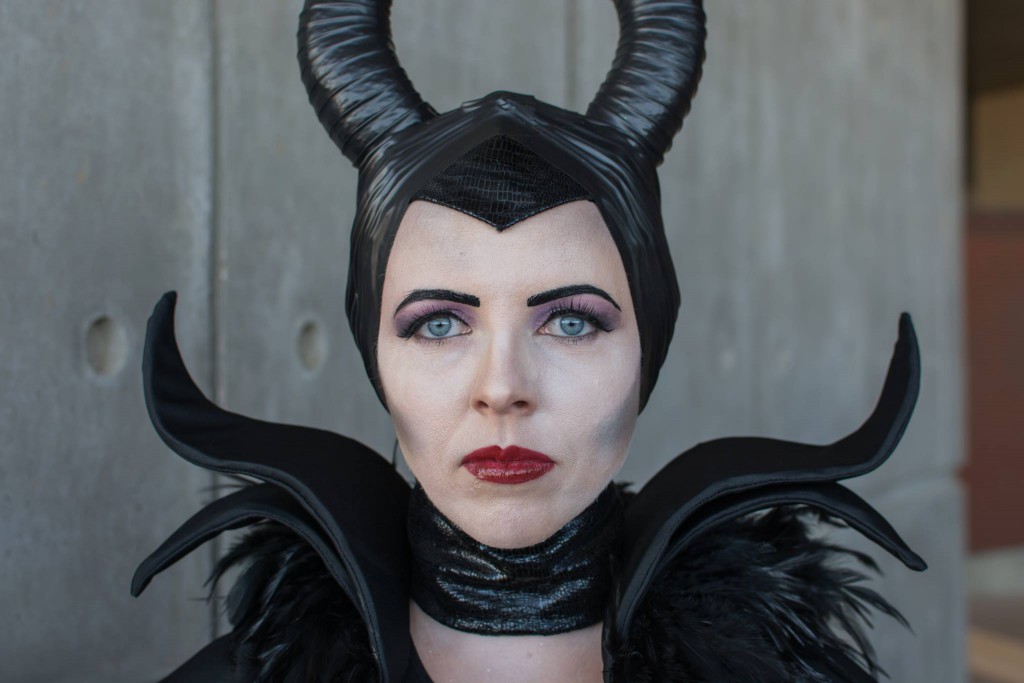
Last Friday I won the Saturday ticket giveaway from the Irving Convention Center for Dallas Comic Con Fan Days! I was so excited, but I didn’t have a new costume finished…and how could I go to Fan Days without dressing up?! I already had Maleficent horns from a previous project, so I took on the challenge of making a Maleficent collar and cloak in one night. Below are some of my behind-the-scenes photos of my late night crafting.
A photo posted by Irving Convention Center (@irvingtxcc) on
Collar
I got some great ideas from this DIY Maleficent tutorial by Pins and Things. She used cardboard and wire to hold the collar upright. I opted for craft foam, hot glue and wire as the core for my collar. I sandwiched the wire between a layer of craft foam. Then I sewed fabric sleeves for each section, pulled it over the craft foam, and sewed up the open end.
Attaching the Collar
The robe for my costume wasn’t going to support the weight of the collar, so I made a base from EVA foam (you can use those interlocking anti-fatigue floor mats, visit my Resources page for where to buy it). Now the whole collar would be a solid, removable piece from the robe. I shaped the EVA foam with a heat gun and made a fabric sleeve for it in the same way I made the collar sleeves. I hot glued and sewed the individual collar pieces to this foam/fabric base, then loosely stitched it to the robe.
Enhancing the Collar
In the recent Maleficent movie, she has a cloak with the iconic pointy collar and a cloak with a feather collar. I took the best of both and added the feathers to mine. I used a section of black hackle feather trim (check Michael’s or Hobby Lobby) and glued it to the collar base with hot glue.
Cloak
I never thought I’d find a use for my graduation gown, but tada! It provided a great base for the Maleficent robe. I purchased 4 yards of black polyester, cut a hole in the middle, and draped it over the robe like a poncho. I sewed the sides of the fabric “poncho” and left room for armholes, then cut open the front and stitched the fabric to the collar of the gown. If I’d had more time, I would have loved to make a really elegant cloak from scratch. Maybe next time!
Horns
And don’t forget the horns! Check out my other post with details about how I made my Maleficent horns. They’re made with reticulated foam, craft foam and electrical tape!
Face
I used a variety of products to create the Maleficent face. I love the purple accents in the cartoon version of Maleficent, so my makeup was a mashup of both Maleficent looks.
Eyes: light and dark purple eye shadow (shown on my hand in the photo)
Eyebrows: Wolfe FX Hydrocolor cake in black
Face: Airbrushed with European Body Art Endura airbrush paint in white and black. Contours with grey eye shadow.
Lips: Vincent Longo lipstick in “Lust” (not shown)
When the Dallas Museum of Art hosted a Wizard of Oz-themed Late Night event, I couldn’t resist making a Flying Monkey costume with my own twist! I already had the black feathered wings, so I just needed to make the outfit. Below are some behind-the-scenes photos of how I put it all together:
1. Hat
The hat is made from a Laughing Cow Cheese container, craft foam, and cotton fabric. Unfortunately I didn’t document it well while I was working on it. The side of the hat is craft foam covered in fabric. I used spray glue (Super 77) to glue the fabric to the craft foam. I drew the zigzag design on paper, then traced it on the red, white, and black fabric, and made each one slightly larger than the last. The zigzag pieces of fabric were also glued with spray glue. I also added a chin strap with thin elastic, like the elastic on party hats.
Materials:
Laughing Cow Cheese container (empty)
Craft foam
Cotton Fabric: light blue, red, white, black
Spray Glue (Super 77)
2. Wig
The wig started out as a weird Moses/Zeus wig from Party City. I didn’t have enough time to order anything online, so I used what I could buy locally. Armed with scissors, I slowly cut away at it to give it the signature widow’s peak of the monkeys (and most simians) in the 1939 edition of Wizard of Oz. I had my doubts at first but I’m really pleased with how it turned out.
Materials:
Grey wig
Scissors
Head form
3. Jacket
I created a paper pattern for the jacket based on reference photos and an existing fleece vest I own. Using plain cotton fabric in light blue, red, white, and black, I cut out all the layers to create the zigzag pattern and jacket base. I glued the zigzag layers together with spray glue (Super 77), attached it to the blue part of the jacket, and added interfacing to give the whole jacket the structured shape. I also added slits in the back of the jacket (not shown) for my wings to poke out.
Materials:
Cotton Fabric: Light blue, red, white, black – measure the amount you need based on your paper patterns and don’t forget about the hat!
Interfacing
4. Bodysuit
This costume, like my dragon costume, features a hand-dyed and painted bodysuit. I first tested the dye on a scrap of Lycra (1st image). I used Jacquard’s Dye-na-flow black, watered it down, added a few drops of Jacquard’s AirFix, and brushed the dye onto the bodysuit. Once it was dry, I painted on the fur with Jacquard’s Neopaque and Lumiere fabric paints.
Materials:
1 white Bal Togs body suit
1 bottle Jacquard Dye-na-flow black
1 bottle Jacquard AirFix
Jacquard Fabric Paints: Black and White (Neopaque), Pewter and Pearlescent Blue (Lumiere)
Paint brushes
5. Feet
I wanted to look like I was barefoot without actually being barefoot! Using some white socks (synthetic fabric), I stuffed them with polyfill, then dyed and painted them with fabric paints (same as used on bodysuit). I applied Zombie Skin (a creamy latex) to the toes to reinforce the toe area. I pulled the stuffing out of the socks, added some foam insoles, then cut out holes for each my toes. When I wear the costume, I paint my toes with same blue bodypaint I use for the face (see #7).
Materials:
White Socks (synthetic fabric, like liner socks)
Zombie Skin (latex)
Polyfill (or rags to stuff inside)
Fabric paints and dyes (see #4 Bodysuit)
6. Wings
I made these wings a few years ago for my Harpy costume but they worked well for my monkey costume too. The frame was commissioned from Danielle Hurley and she does amazing work! I used chicken wire as the frame for the wings and hot-glued it to black canvas. I hot-glued approximately 350 black turkey feathers for the wings and used down from a black feather boa for the top. Needless to say, these wings are a tad heavy but they are definitely sturdy!
Materials (for the wings, not the frame):
Black canvas fabric
Chicken wire
Gloves and wire cutters
Black turkey feathers
Black feather boa
7. Face
I followed reference photos from the movie so I could capture the big smirk of the monkeys. Since I wasn’t using any prosthetics, I also needed to give the illusion of monkey features with makeup. I painted my nostrils black to make them look wider and added accent lines to widen my nose and mouth. I used professional water-based bodypaint to paint my face, hands, and toes and red lipstick on my lips.
Bodypaints (all water-activated cakes):
I’ve created an Amazon list with most of these products.
I’ve also been known to hang around with a certain Wicked Witch of the West (Chelphie Cosplay) at various events. Have a look at photos of our dynamic Oz duo.


 I got some great ideas from this
  The robe for my costume wasn’t going to support the weight of the collar, so I made a base from EVA foam (you can use those interlocking anti-fatigue floor mats, visit my
 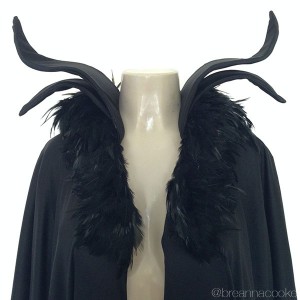 In the recent Maleficent movie, she has a cloak with the iconic pointy collar and a cloak with a feather collar. I took the best of both and added the feathers to mine. I used a section of black hackle feather trim (check Michael’s or Hobby Lobby) and glued it to the collar base with hot glue.
 I never thought I’d find a use for my graduation gown, but tada! It provided a great base for the Maleficent robe. I purchased 4 yards of black polyester, cut a hole in the middle, and draped it over the robe like a poncho. I sewed the sides of the fabric “poncho” and left room for armholes, then cut open the front and stitched the fabric to the collar of the gown. If I’d had more time, I would have loved to make a really elegant cloak from scratch. Maybe next time!
 I used a variety of products to create the Maleficent face. I love the purple accents in the cartoon version of Maleficent, so my makeup was a mashup of both Maleficent looks.


