Come create with me! Join me on March 5th for a headdress workshop and learn how to build a lightweight headdress base. You’ll get hands-on experience with a variety of materials, such as EVA foam. Contact Anja Yamaji to register (see the image for contact details) or use the PayPal button below to pay.
Cutting Mats
We will be sharing some of the tools, like cutting mats, in this workshop. If you already have a cutting mat, feel free to bring it to class. If you want to buy a cutting mat, you can find them at Michael’s (don’t forget your 40% off coupon) or try this Fiskars 18×24 Cutting Mat on Amazon (it’s what I have).
Register Online via PayPal
To register for the class, click “Pay Now” to complete your transaction with PayPal.
I finally made a Mystic costume from the Dark Crystal! It’s been on my costume wish-list for a long time. There are still a lot of improvements to be made, but I got the costume to a wearable point just in time for the May Dallas Comic Con in 2015. Keep scrolling down to see my process photos.
Mystic Head
1 – Cut foam shapes from Poly Foam;
2 – Sculpted with razors and engraved lines with a soldering iron;
3 – Covered with tissue paper and spray glue;
4 – Brushed on liquid latex from BITY Mold Supply;
5 – Painted with airbrush and various acrylics. Glued on wig and hair segments.
6 – Done! Photo by Alan Tijerina Photography.
Mystic Feet
1 – Pool noodles and pipe insulation carved with razors and utility knife;
2 – Covered with spray glue and white tissue paper;
3 – Brushed on liquid latex from BITY Mold Supply;
4 – Painted with airbrush and various acrylics.
Mystic Hands
1 – Poly foam and pipe insulation carved with razors and utility knife (hat tip to Courtney and Scotty at Zod Fabrication for sharing their raptor hand photos!);
2 – Covered with spray glue and white tissue paper;
3 – Brushed on liquid latex from BITY Mold Supply;
4 – Painted with airbrush and various acrylics.
5 – Attached to costume. My real hands are in the front hands. Photo by Alan Tijerina Photography.
Mystic Body
1 – Poly foam pieces glued with Barge Cement. (I made paper templates before cutting each piece of foam);
2 – More poly foam (looks like an armadillo!). Tail made with a white bedsheet and stuffed with poly filling;
3 – Arms made with pool noodles;
4 – Arms covered with poly foam;
5 – Shirt made from two bedsheets and hand-sewn to fit;
6 – Final costume worn at #DallasFanExpo
Mystic Armor
1 – EVA foam (anti-fatigue mat) for armor pieces. Shaped with heat gun. (I made paper templates before cutting each piece of foam);
2 – Traced each piece of armor in fabric;
3 – Glued fabric to EVA foam with spray glue;
4 – Glued pieces of tan fabric for details, painted with airbrush and various acrylics;
5 – Closeup of bracer;
6 – Final costume worn at #DallasFanExpo
This Friday, the Dallas Museum of Art is traveling through the decades at their Late Night event. Costumes are encouraged and they invited me to write a guest blog post. I’ve put together a DIY 1920s Flapper headband tutorial, along with some ideas for the rest of the outfit. Check it out over on their blog, Uncrated: https://uncrated.wordpress.com/2015/08/19/speakeasy-star/
Last Friday I won the Saturday ticket giveaway from the Irving Convention Center for Dallas Comic Con Fan Days! I was so excited, but I didn’t have a new costume finished…and how could I go to Fan Days without dressing up?! I already had Maleficent horns from a previous project, so I took on the challenge of making a Maleficent collar and cloak in one night. Below are some of my behind-the-scenes photos of my late night crafting.
A photo posted by Irving Convention Center (@irvingtxcc) on
Collar
I got some great ideas from this DIY Maleficent tutorial by Pins and Things. She used cardboard and wire to hold the collar upright. I opted for craft foam, hot glue and wire as the core for my collar. I sandwiched the wire between a layer of craft foam. Then I sewed fabric sleeves for each section, pulled it over the craft foam, and sewed up the open end.
Attaching the Collar
The robe for my costume wasn’t going to support the weight of the collar, so I made a base from EVA foam (you can use those interlocking anti-fatigue floor mats, visit my Resources page for where to buy it). Now the whole collar would be a solid, removable piece from the robe. I shaped the EVA foam with a heat gun and made a fabric sleeve for it in the same way I made the collar sleeves. I hot glued and sewed the individual collar pieces to this foam/fabric base, then loosely stitched it to the robe.
Enhancing the Collar
In the recent Maleficent movie, she has a cloak with the iconic pointy collar and a cloak with a feather collar. I took the best of both and added the feathers to mine. I used a section of black hackle feather trim (check Michael’s or Hobby Lobby) and glued it to the collar base with hot glue.
Cloak
I never thought I’d find a use for my graduation gown, but tada! It provided a great base for the Maleficent robe. I purchased 4 yards of black polyester, cut a hole in the middle, and draped it over the robe like a poncho. I sewed the sides of the fabric “poncho” and left room for armholes, then cut open the front and stitched the fabric to the collar of the gown. If I’d had more time, I would have loved to make a really elegant cloak from scratch. Maybe next time!
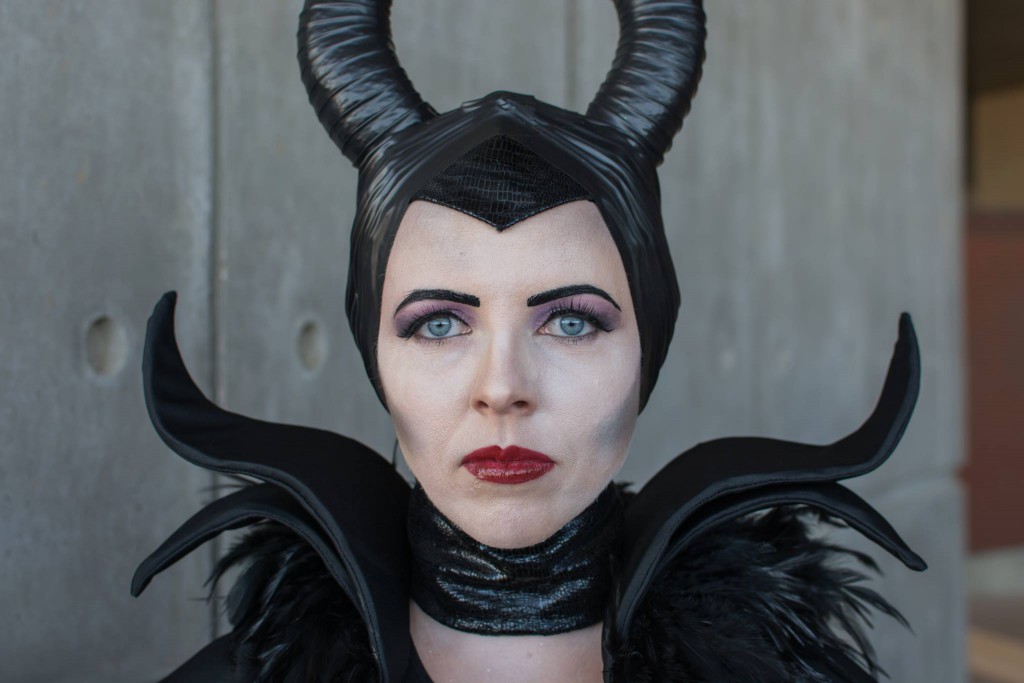
Horns
And don’t forget the horns! Check out my other post with details about how I made my Maleficent horns. They’re made with reticulated foam, craft foam and electrical tape!
Face
I used a variety of products to create the Maleficent face. I love the purple accents in the cartoon version of Maleficent, so my makeup was a mashup of both Maleficent looks.
Eyes: light and dark purple eye shadow (shown on my hand in the photo)
Eyebrows: Wolfe FX Hydrocolor cake in black
Face: Airbrushed with European Body Art Endura airbrush paint in white and black. Contours with grey eye shadow.
Lips: Vincent Longo lipstick in “Lust” (not shown)
Last year, I did a photoshoot in my green dragon costume with Ken Pearson Photography. Needless to say, he made me look amazing! Below are some of the photos from the shoot.
My tutorial also received a great write-up by the Dallas Morning News Arts Blog and they also explain how you can earn DMA Friend rewards points for dressing up. KERA’s Art & Seek blog also featured my tutorial in their Tuesday Morning Roundup.
See you at the DMA, in costume (of course)!
Update 09/17/2022: The link on the DMA website is broken. Here’s the full blog post below.
How to Create a Greek Hero Costume
Need help creating a Greek mythology costume for the DMA’s Late Night this Friday? Below are some simple steps to make your own costume without sewing or spending a lot of money. We’ll start with making a chiton (pronounced khitōn), the draped garment typically worn in ancient Greece.
Supplies
• White sheet OR 2 yards (approx.) of white or cream fabric: It should be long enough to hang from your shoulder to the floor. If you want it to be knee-length, you’ll only need about 1.5 yards or less.
• Safety pins: We’ll be pinning the fabric together, but you can also sew it together.
• Gold rope, belt, or ribbon
• 2 brooches (optional)
Making a Greek Chiton
1. Cut the Fabric
Cut the fabric lengthwise so you have two long rectangles. One rectangle is the front, and the other is the back. If you’d like to have a knee-length chiton (more common for men), this is a good time to cut it shorter. (Bonus: If you don’t like the frayed edge at the bottom of the fabric, you can glue gold ribbon along the bottom edge to cover it.)
2. Pin the Shoulders and Sides
With safety pins, fasten the top corners of the front to the top corners of the back. You’ll want to bunch the fabric together a bit as you pin it. Be sure to tuck in the edges of the fabric if it’s fraying. Next, pin the sides of fabric together along your ribcage. It doesn’t have to be perfect, this is to help keep the fabric from blowing open.
3. Tie on Your Belt
Tie your belt around your waist or rib cage. You can use any kind of belt, rope, or ribbon. You can even paint something gold if you don’t have anything.
4. Add the Brooches
Pin your brooches to your shoulders. You can use them to hide the safety pins. I didn’t have any brooches, so I bought some earrings at a thrift store, glued them together, and added a pin to the back. You could even make your own out of cardboard or craft foam and paint them. Get creative!
Accessories and Props for Your Specific Greek Character
It’s time to customize your outfit with some props. They don’t have to be complicated in order to be effective. Below are some simple ideas to help identify yourself as a specific character: 1. Lightning Bolt and Beard = Zeus, King of the Greek Gods Lightning Bolt: Draw a lightning bolt on foam board or poster board; cut out the shape and color with silver paint. Beard: Paint on a beard with face paint OR purchase a beard from a party or costume store.
2. Laurel Wreath = Apollo, God of Music, Arts, and Enlightenment Laurel Wreath: Create a headband with poster board. Draw leaves and cut them out. Use hot glue to stick the leaves in place, overlapping as you go. Color with gold spray paint.
3. Feathery Wings = Eros, God of Love (Cupid!), or Nike, Goddess of Victory Wings: Purchase wings from a costume or party store OR draw wings on poster board. Cut out the shape of the wings, attach elastic straps with hot glue, and loop over shoulders.
4. Shield, Spear, Helmet = Athena, Goddess of Warfare Shield: Find a large plastic platter or cut a circle out of foam board. Glue on a handle made of foam board or cardboard; color with gold spray paint. Spear: Use a broom handle or dowel and color with gold spray paint. Draw a spearhead on craft foam. cut out two spearheads from the craft foam. Glue the craft foam together at the edges, and slide the broom handle into the pocket formed by the two pieces. Helmet: Purchase gladiator-style helmet at a costume or party store; color with gold paint OR get creative with craft foam and hot glue to make your own!
4. Shield, Spear/Sword = Hercules or Achilles, Hero of the Trojan War Shield and Spear: Follow steps above for Athena.
6. Gold Tiara/Crown, Veil = Hera, Goddess of Marriage and wife of Zeus Tiara/Crown: Make a crown out of poster board; color with gold spray paint. Veil: Take a piece of sheer fabric or leftovers from your chiton; attach to tiara/crown with staples.
7. Roses and Scallop Shells = Aphrodite, Goddess of Love Roses: Purchase some fake roses or flowers from a thrift store; color them with gold spray paint. Scallop Shells: Draw some shells on poster board; color with gold spray paint and add the shells to your flower bouquet.
Need to look up some other characters from Greek mythology? Check out this list on Wikipedia for more ideas.
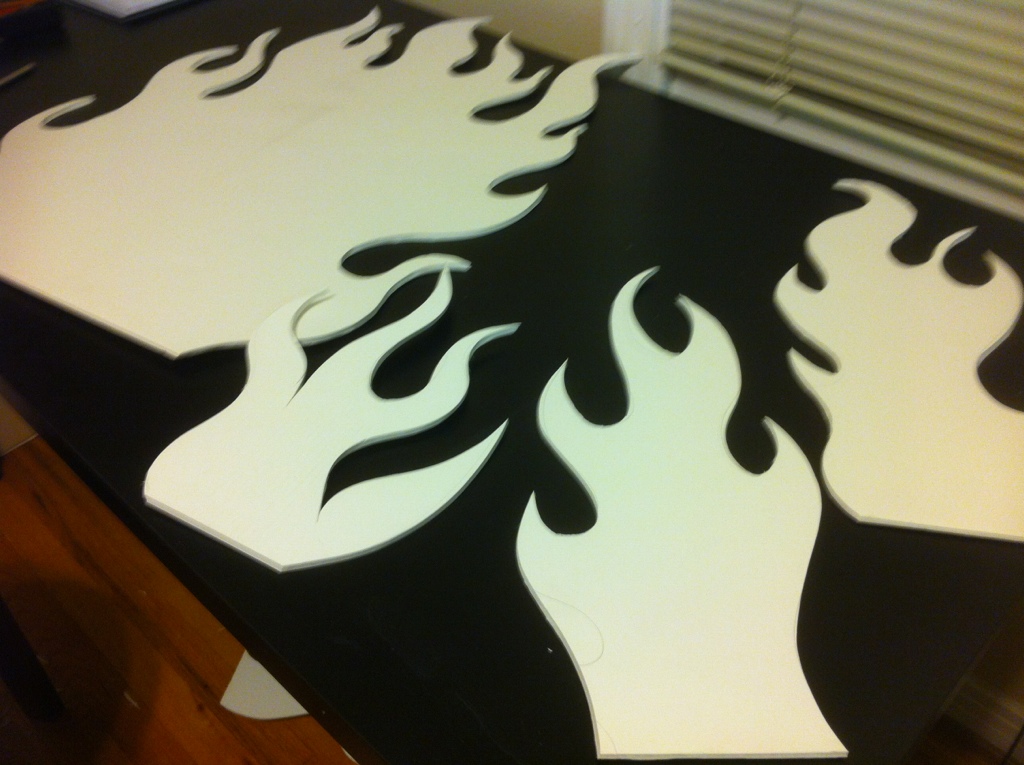
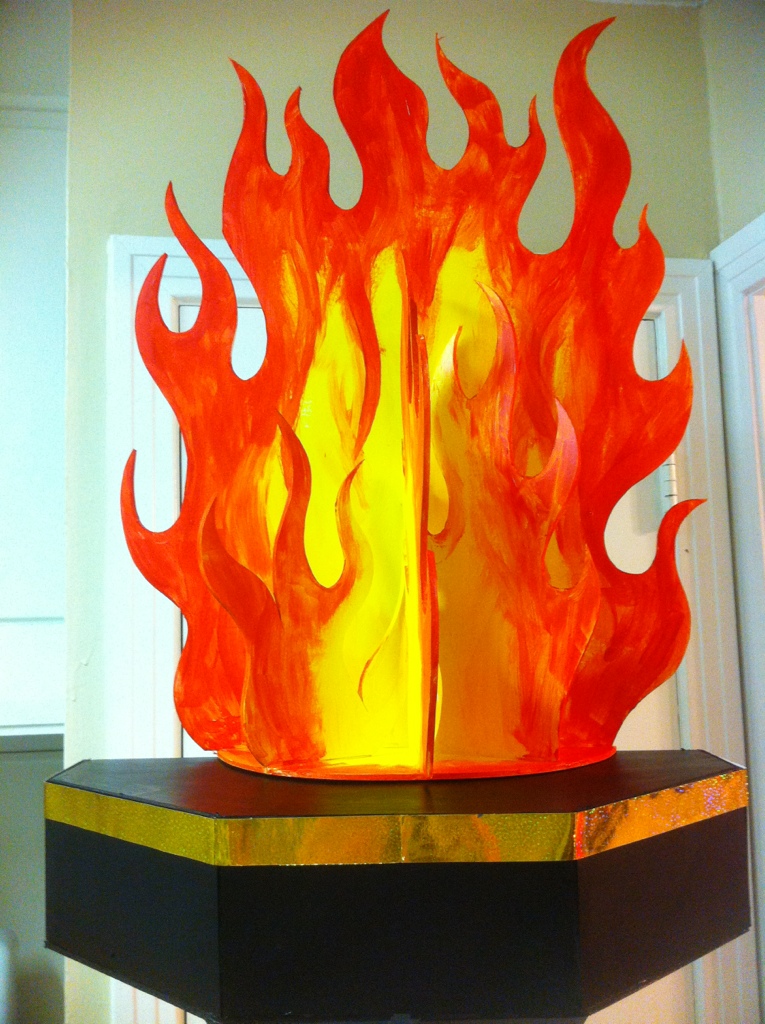
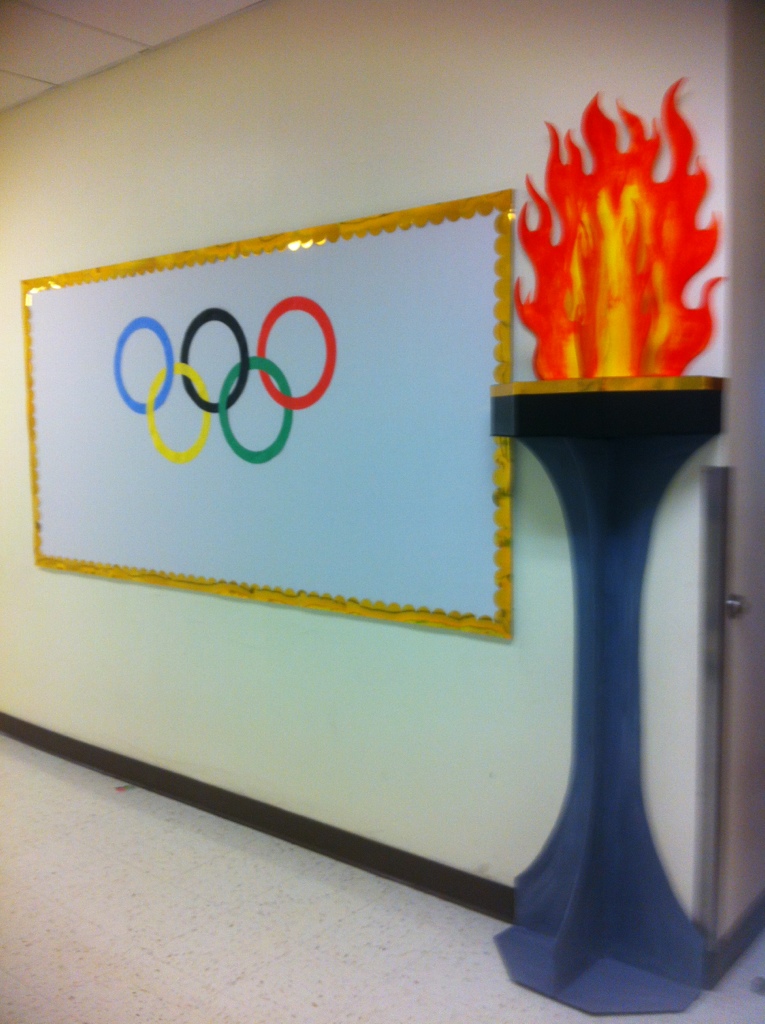
I recently made an Olympic torch/cauldron for my friend’s Olympic-themed classroom. It took about 6 hours to make. It it freestanding, but we attached it to the wall so it wouldn’t get bumped over, it was pretty lightweight
Despite the size. I designed the torch pattern myself and it’s made from foamboard, hot glue, and paint. That’s it!
HARPY: Classical Mythology . a ravenous, filthy monster having a woman’s head and a bird’s body.
Below are some instructions on what I did to accomplish this harpy costume for Halloween 2011.
Step 1: Plan It Out
I first started out with a sketch based on some good ol’ Googling of harpies. I particularly liked the ones in World of Warcraft. As you can see, my final product evolved a bit differently from the sketch (colored wings became a bit too time consuming):
Harpy Costume Sketch | Breanna Cooke
Step 2: Make Giant Wings
The frame is the most critical part to having awesome wings. I commissioned the help of an expert in wing-making, Danielle Hurley. Her craftsmanship is top-notch and the frame fit me perfectly. I’d highly recommend contacting her if you’d like some wings. Check out more of her work on her website or her blog.
To support the feathers, I made a frame from chicken wire and glued it onto some black canvas.
I used black turkey quills and started applying from the bottom up. I ordered 500 feathers (250 of each wing side) and probably used about 300-350. I also used bits of black down from a feather boa to mask the transition of quills at the top of the wings.
Step 3: Make Bird Feet
I built my bird feet on top of an existing pair of boots that I knew were comfortable. It helped that they already had pointed toes. I used green craft foam to shape the toes and hot-glued them on. The talons are fake bear claws. The bear claws were more proportional to my body than fake eagle talons.
I painted the green foam with brown paint so it would all match. Then I covered the boots in tan liquid latex. In hindsight, this may not have been the best material, but it gave it the rubbery skin-like texture I wanted.
I painted the final boots with acrylic paints (again, maybe not the best type of paint since it kept cracking).
Step 4: Paint Yourself
I painted myself with professional grade body paint using a sponge and brush. I usually use the water activated cakes from the Paradise line by Mehron since I can buy them locally at Norcosto in Dallas. I also order online from Silly Farm when I have more time to spare.
The fangs were from a Halloween shop. I recommend going for the most realistic ones, even if they cost more. The nails were also from the costume shop and glued on with nail glue.
Step 5: Go Scare Small Children or Become an Object of Envy at a ComicCon
This year’s costume was Neytiri from Avatar. I decided to use body paint instead of liquid latex like my Mystique costume last year. I did the majority of painting myself, though I needed help with my back. Here is the final result, but keep scrolling down if you’d like to see more photos of the process. The professional photos are courtesy of T.J. Hall Photography.
Photo by TJ Hall PhotographyFull body paint costume for Neytiri from Avatar. Photo from T.J. Hall Photography | www.tjhallphotography.comBackside of body paint.
Body Paint
I purchased a “Pandora Kit” from SillyFarm.com. The kit included all the blues I needed, and it worked perfectly for painting a full body. I also purchased some glow-in-the-dark body paint so that the white dots would glow.
1. Apply the light blue all over your body with a sponge.
Starting out the painting
2. Use the 2-blue combo cake (it should be shimmery) for the stripes. Start by painting stripes with the dark blue, then add a highlight with the light blue right on top of the dark one.
Painting Progress
3. Use white is for adding the dots, then go over them again with glow paint (optional).
Closeup of arm details.
UPDATE 10/10/2012: Check out my tips on how to seal water-based body paint. This will help prevent your paint from rubbing off on everything.
Costume
I made the beaded arm bands by painting Mardi Gras beads and sewing them onto elastic bands.
Painting Mardi Gras beads with acrylic paintCloseup of arm bands.
I purchased the wig online. If you search for “Deluxe Neytiri wig with ears” you’ll find the same wig from various vendors. I also glued some feathers into the braids to make it fuller and match Neytiri.
Feathers added to the braids of the wig.
I made the outfit from scraps of fabric and a bikini bra top from the fabric store. I made the straps by braiding fabric and I stitched fabric on to the front of the bra cups by hand. The loincloth (not pictured) was two rectangles of fabric sewn on to a pair of black underwear.
Bra top from fabric store.Straps made of braided fabric.Top with fabric attached.
I fulfilled my dream, I was Mystique from X-men!… I know, I take Halloween WAY too seriously.
I already have red hair, so that was the easy part. The hard part was painting my body with liquid latex! I’ve outlined some thoughts on applying liquid latex, so keep scrolling on down!
My Mystique costume
Reference photos:
I researched a bunch of Mystique images and I opted to follow the face and hair of the movie version.
Reference for Mystique face
And I followed the clothes and body of the comic book version.
Reference image for Mystique’s clothes
Purchasing Liquid Latex:
This was my first time buying liquid latex. I purchased liquid latex from www.liquidlatex.com and this was my order:
32 oz. Blue liquid latex – Since I only painted half my body, there was at least half the jar left over.
2 oz. Blue sparkle – I’d highly recommend mixing this in to the latex (rather than applying on top) for your last coat or two. It gave the latex a really luminous sheen.
4 oz. Body Wash – Highly recommend this too! At the end of the night, it instantly helped remove the latex that was caught in my hairline and in my arm hair.
4 oz. Shine Spray – Must have! The website FAQs are absolutely correct. Rubbing on the shine spray as the last coat removed all the tackiness from the latex. Without it, the latex sticks to itself.
Liquid latex application tips:
Allow a lot of time! It took me a around 5 hours. That includes application and drying time.
Consider a layer of white latex. Since the latex is translucent, your skin color will show through if you don’t put on enough coats. In my case, I had to apply 5-6 layers of latex before it stopped looking blue/green. I think a layer of white latex would help tone down your skin color and only require 3-4 coats of blue.
2nd coat of liquid latex and it still looks greenish
Armpits are tricky. Once you do your armpits, you can’t put your arms down until you’ve applied the Shine Spray. The latex will stick to itself and will start ripping once you lift your arms. I don’t know how to improve that aspect.
Wow, it’s stinky. It’s especially hard to apply around your nose and eyes because the ammonia fumes are really harsh. If you’re allergic, it will not be fun for you.
A bit of a stranglehold. The latex will shrink and feel like wearing a tight rubber glove. It was a little alarming when the latex on my neck tightened. If you don’t like wearing chokers, you will not enjoy the feeling of latex on your neck.
Comes off fast…for the most part. As long as it’s not in your hair, the latex peels off really quickly. I had some stuck in my hairline, but rubbing on the Body Wash helped rinse it out quickly.
The Mystique Face
To make the scales on my face I cut out pieces of blue craft foam and stuck them onto my face with liquid latex. Then I painted over the scales with liquid latex.
To create the scaly face, I glued blue craft foam on, then painted over with latex.The finished product!


 I got some great ideas from this
  The robe for my costume wasn’t going to support the weight of the collar, so I made a base from EVA foam (you can use those interlocking anti-fatigue floor mats, visit my
 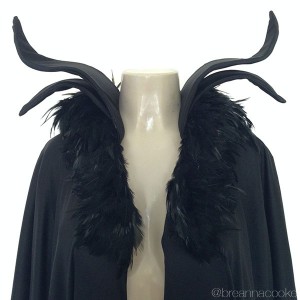 In the recent Maleficent movie, she has a cloak with the iconic pointy collar and a cloak with a feather collar. I took the best of both and added the feathers to mine. I used a section of black hackle feather trim (check Michael’s or Hobby Lobby) and glued it to the collar base with hot glue.
 I never thought I’d find a use for my graduation gown, but tada! It provided a great base for the Maleficent robe. I purchased 4 yards of black polyester, cut a hole in the middle, and draped it over the robe like a poncho. I sewed the sides of the fabric “poncho” and left room for armholes, then cut open the front and stitched the fabric to the collar of the gown. If I’d had more time, I would have loved to make a really elegant cloak from scratch. Maybe next time!
 I used a variety of products to create the Maleficent face. I love the purple accents in the cartoon version of Maleficent, so my makeup was a mashup of both Maleficent looks.