Tag: Halloween

How To Make Maleficent Horns

Maleficent hornsNeed Maleficent horns ASAP for Halloween? Here’s how I made a headpiece, inspired by the 2014 movie version of Maleficent. I made these pretty quickly so the process isn’t documented as well as I would have liked, but hopefully you’ll find some useful tidbits!

You will need:

  • Craft foam
  • Electrical tape
  • Reticulated foam (upholstery foam or styrofoam could work too)
  • Black faux snakeskin or pleather fabric
  • Tin foil and duct tape (for the helmet template)
  • Utility knife
  • X-acto knife
  • Scissors
  • Contact cement
  • Paper and sharpie (for the helmet and horn template)

1. Make a helmet with craft foam.

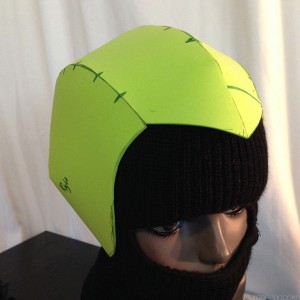
I learned out to make this helmet from Evil Ted Smith’s Youtube tutorial. Watch his video to learn how to make a helmet template that fits your head. Instead of using thick EVA foam, I used craft foam for a more flexible headpiece. I was a bit rushed so the seams aren’t as smooth and rounded as they could be.

2. Draw a horn template, trace it onto reticulated foam, and carve it out.

BreannaCooke_MaleficentHorns_0009_merged
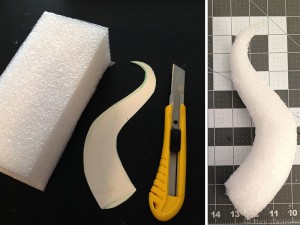
Draw a horn shape on paper. If you need a template, check out my Maleficent Horn Printable Template digital download. Cut the paper template out, then trace it onto a block of reticulated foam or upholstery foam. Remember to trace out the horn twice.

Then carve the horn out of the foam with a utility knife or with scissors. Make sure the blade is sharp. Compare your horns with each other to be sure you’re getting the right shape. You can find upholstery foam at most fabric stores. Reticulated foam is often used as padding in packaging so you might need to hunt around for some.

Horns made from upholstery foam being glued together with liquid latexIf your foam is not thick enough, glue two sheets together with rubber cement or liquid latex.

Use scissors or a box cutter to shape the horns Use scissors or a box cutter to shape the horns, as if you are whittling a piece of wood. As you work on the second horn, compare it to the first one to be sure they are the same shape.

3. Cover the horns with electrical tape.

BreannaCooke_MaleficentHorns_tape
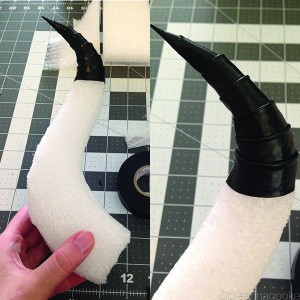
I used electrical tape to create the horn ridges. Instead of wrapping the electrical tape around in a spiral, I cut each piece individually. Fold over the top edge of the tape to achieve the ridged effect. For a more realistic-looking horn, you can make the ridges with paper towels and liquid latex. Check out my demon horn tutorial over at Make Magazine that outlines those steps in detail.

4. Glue snakeskin fabric on the front of the headpiece.

BreannaCooke_MaleficentHorns_0001 copyUse contact cement to apply the fabric to the front and fold it under the front edge.

5. Glue horns on and cover the helmet with electrical tape.

BreannaCooke_MaleficentHorns_0008
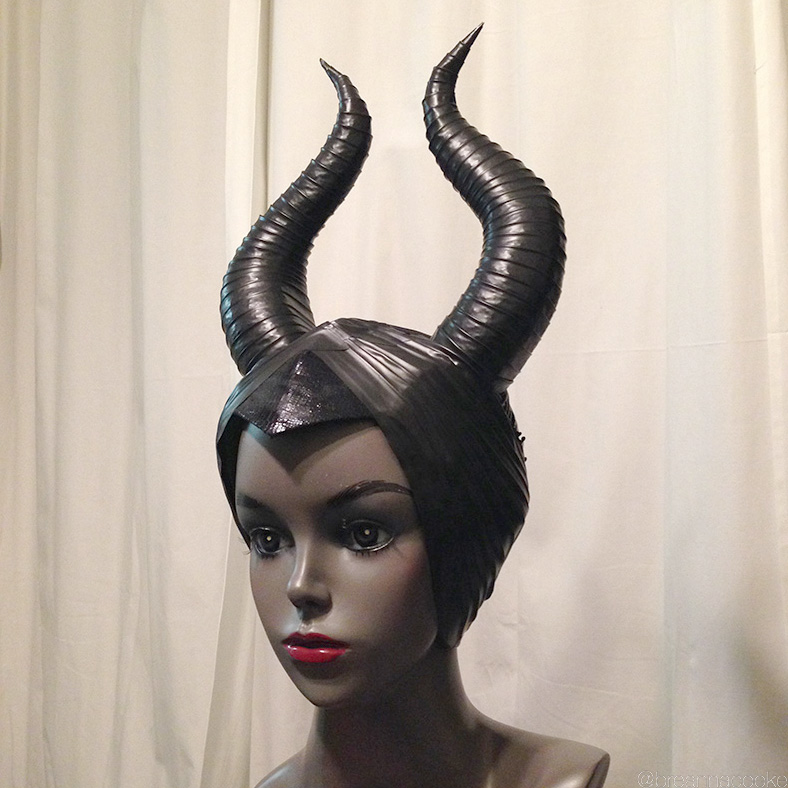
Glue the horns on with contact cement. To cover the rest of the helmet with tape, start at the base of the horns and weave your pieces of electrical tape around the helmet. I cut shorter pieces instead of trying to wrap long pieces all the way around. Continue to fold the top edge of the tape over to achieve ridges all the way down.

6. Go be fierce!

BCooke_DHB2014_0018


Need a Maleficent cloak and collar?

Breanna Cooke as Maleficent | Photo by Alan Tijerina

Check out my (very hastily made) cloak using a graduation gown as the base and craft foam with wire to make the collar. I’ve outlined the materials and steps here in this blog post.

Need makeup product ideas?

Visit my Amazon Storefront for some makeup and body paint product recommendations.

Shop Makeup Supplies on Amazon

Fiery Phoenix Costume

BCooke_10-2012_BreannaThePhoenix_10022

My Halloween costume was a mythological phoenix, the colorful red and gold bird that bursts into flames and is reborn from its own ashes. This costume consumed all my free time in September and October, but I’m really pleased with the result! I’ve posted these instructions on Instructables.com too!

Bodysuit:

– 1 white full body unitard (Bal Togs brand)
– Jaquard brand fabric paints – 2.25fl oz size
– Lumiere line (2 crimson, 2 gold, 2 burgundy, 1 burnt orange)
– Neopaque line (2 yellow, 2 gold yellow, 2 red, 1 black)
– paint brushes
– 1 iron (for heat setting)
– 1 mannequin to hold your bodysuit’s shape

How-to Paint the Body Suit:

Plan out your design, then start painting! This design took me at least 40 hours to complete. Having a mannequin is crucial for holding the body suit in the stretched position. The body suit is made primarily from nylon, so I chose Jaquard paints because they were one of the few that list nylon as a suitable base. If your body suit is made from a different fabric, you may want to investigate a different brand of paint or do a test sample. After the body suit is dry, flip it all inside out and iron it with the correct setting for the fabric. I placed towels in the legs and arms so the designs weren’t pressed together under the heat.

Bird Feet Boots:


– 1 pair of boots
– 1 inch thick green high-density foam (sold a fabric stores for seat cushions)
– white craft glue
– scissors
– 6 fake bear claws
– black or brown acrylic paint
– 16oz liquid latex
– foam brushes
– fabric paints for painting the boots to match (leftover from body suit)
– paint brushes
– Hot glue and gun OR Liquid Nails perfect glue

How-to Create Bird Feet Boots:

Using craft glue, stick together pieces of foam so that they are wide enough for a toe (about 3 inches wide). Shape the foam with scissors so that it is rounded and toe-like (repeat 5 more times). Cut out an insert for the claw, but don’t glue the claw in yet. Paint the green foam with acrylic paint so it matches the boots. Using the foam brushes, paint the toes and boots with liquid latex. Be sure to follow the instructions on the liquid latex. Once the latex is dry, glue in the claws. Then paint the boots to match your costume. I used fabric paints since they would match the body suit even though they’re not the perfect paint for sticking to latex (and I’m not sure what is).

Headpiece:


– 2 4’x4′ pieces of polyethylene foam
– hot glue and gun
– 1 red and 1 gold spray paint
– 2-3 sheets of kids thin craft foam
– acrylic and fabric paints (leftover from body suit)
– paint brushes

How to Create Foam Headpiece:

Create paper patterns of each spiral piece and cut them out of polyethylene foam. Glue the pieces together with hot glue so that the flat sides are together and there’s a space for your head. It’s almost like making a helmet. Cut out pieces of the thin craft foam for the beak and side “feathers” and glue on with hot glue. Give the entire headpiece a base coat with spray paint, then add accents of color with acrylic paint and any leftover fabric paint.

Wings:

BCooke_10-2012_BreannaThePhoenix_04018

– 1 pair of Isis belly dance wings (available online)

Face:

BCooke_10-2012_BreannaThePhoenix_07020
– Face and body paint – Paradise, FAB, and Kryolan water-based cakes
– paint brushes

How-to:

With water-based face/body paints, dip your brush in water and rub it on the surface of the dry cake until the paint is a smooth and creamy consistency. Now paint your face however you wish! I don’t have any process photos of this part, so you get to be creative!

BCooke_10-2012_BreannaThePhoenix_01015

Mystique Costume with liquid latex

I fulfilled my dream, I was Mystique from X-men!… I know, I take Halloween WAY too seriously.

I already have red hair, so that was the easy part.  The hard part was painting my body with liquid latex!  I’ve outlined some thoughts on applying liquid latex, so keep scrolling on down!

MystiqueForHalloween_10-31-2009_08_crop
My Mystique costume

MystiqueForHalloween_10-31-2009_05_crop

Reference photos:

I researched a bunch of Mystique images and I opted to follow the face and hair of the movie version.

Reference for Mystique face

And I followed the clothes and body of the comic book version.

Reference_mystique-2
Reference image for Mystique’s clothes

Purchasing Liquid Latex:

This was my first time buying liquid latex.  I purchased liquid latex from www.liquidlatex.com and this was my order:

  • 32 oz. Blue liquid latex – Since I only painted half my body, there was at least half the jar left over.
  • 2 oz. Blue sparkle – I’d highly recommend mixing this in to the latex (rather than applying on top) for your last coat or two.  It gave the latex a really luminous sheen.
  • 4 oz. Body Wash – Highly recommend this too!  At the end of the night, it instantly helped remove the latex that was caught in my hairline and in my arm hair.
  • 4 oz. Shine Spray – Must have! The website FAQs are absolutely correct.  Rubbing on the shine spray as the last coat removed all the tackiness from the latex. Without it, the latex sticks to itself.

Liquid latex application tips:

  • Allow a lot of time! It took me a around 5 hours. That includes application and drying time.
  • Consider a layer of white latex.  Since the latex is translucent, your skin color will show through if you don’t put on enough coats.  In my case, I had to apply 5-6 layers of latex before it stopped looking blue/green.  I think a layer of white latex would help tone down your skin color and only require 3-4 coats of blue.

    MystiqueForHalloween_10-31-2009_15
    2nd coat of liquid latex and it still looks greenish
  • Armpits are tricky. Once you do your armpits, you can’t put your arms down until you’ve applied the Shine Spray. The latex will stick to itself and will start ripping once you lift your arms. I don’t know how to improve that aspect.
  • Wow, it’s stinky. It’s especially hard to apply around your nose and eyes because the ammonia fumes are really harsh. If you’re allergic, it will not be fun for you.
  • A bit of a stranglehold. The latex will shrink and feel like wearing a tight rubber glove. It was a little alarming when the latex on my neck tightened.  If you don’t like wearing chokers, you will not enjoy the feeling of latex on your neck.
  • Comes off fast…for the most part. As long as it’s not in your hair, the latex peels off really quickly. I had some stuck in my hairline, but rubbing on the Body Wash helped rinse it out quickly.

The Mystique Face

To make the scales on my face I cut out pieces of blue craft foam and stuck them onto my face with liquid latex.  Then I painted over the scales with liquid latex.

MystiqueForHalloween_10-31-2009_16
To create the scaly face, I glued blue craft foam on, then painted over with latex.
Closeup of Mystique face
The finished product!