This Friday, the Dallas Museum of Art is traveling through the decades at their Late Night event. Costumes are encouraged and they invited me to write a guest blog post. I’ve put together a DIY 1920s Flapper headband tutorial, along with some ideas for the rest of the outfit. Check it out over on their blog, Uncrated: https://uncrated.wordpress.com/2015/08/19/speakeasy-star/
We spent the afternoon painting our models, meeting other artists, and answering questions from spectators. The theme of this year’s event was “What the world needs now…”. It was intentionally vague to give the artists lots of room for expression. My interpretation of the theme is: “What the world needs now is…clean water.”
After painting, we paraded to the United Nations, boarded double-decker buses, and drove around New York City, sharing our art. We stopped at a few locations for group photos and had an incredible response from people on the street.
Exciting news: My coloring book is also available to order through Amazon!
The books are still printed on-demand, so they’ll ship just as soon as they’re made. If Amazon is where you shop or you’re already ordering something, then nab one of my books there. It’s eligible for free shipping on orders over $35 or Amazon Prime (it will be sent with 2-day shipping after it’s printed)!
Don’t forget to share your coloring and tag #EveryoneColors!
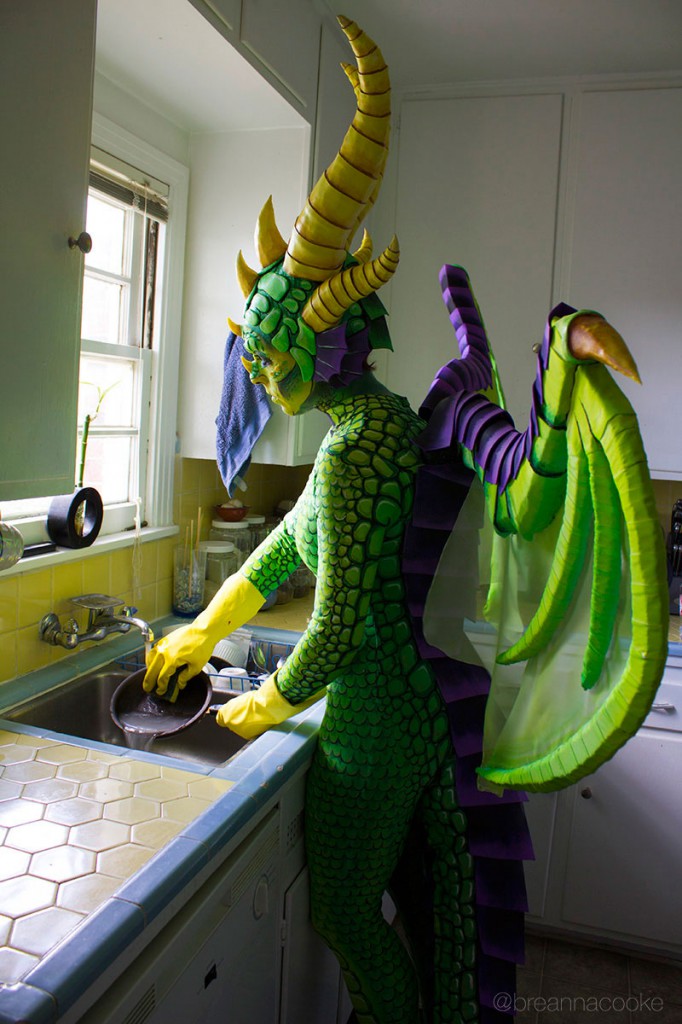
Ever wonder what dragons do all day? You may think that they just hoard gold and breathe fire, but dragons lead a surprisingly normal life. Here’s a glimpse into what goes on:
First, they sit and think.
Then they start working on some chores, like mowing the lawn,
And watering the plants.
They spend time keeping their claws nice and tidy.
They take breaks by watching movies,
And make afternoon snacks.
They clean up the dishes,
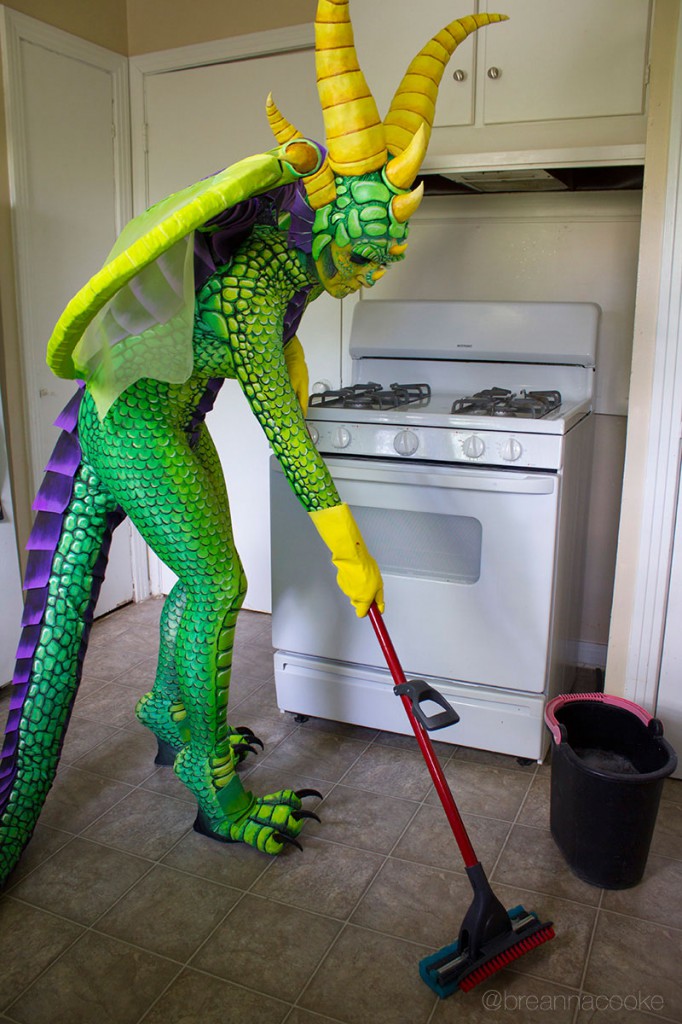
And mop the kitchen floor.
Then to top off the day, they go for a car ride! Wheeee!
Photography by Brian Merlo
Interested in seeing how this costume was created? Check out my blog post: Green Dragon Costume
If you live in Atlanta, you’ve got 3 amazing opportunities to see beautiful body painting this week!! Be sure to buy your tickets in advance, tickets will not be sold at the door.
Halloween 2013 was the year for a dragon! I took most of my inspiration from Ysera in World of Warcraft. I’ve outlined most of the process in my tutorial on instructables.com. Go check it out there or take a look at my process photos below. I also won a 2nd prize from Instructables for my dragon, yea!
My tutorial also received a great write-up by the Dallas Morning News Arts Blog and they also explain how you can earn DMA Friend rewards points for dressing up. KERA’s Art & Seek blog also featured my tutorial in their Tuesday Morning Roundup.
See you at the DMA, in costume (of course)!
Update 09/17/2022: The link on the DMA website is broken. Here’s the full blog post below.
How to Create a Greek Hero Costume
Need help creating a Greek mythology costume for the DMA’s Late Night this Friday? Below are some simple steps to make your own costume without sewing or spending a lot of money. We’ll start with making a chiton (pronounced khitōn), the draped garment typically worn in ancient Greece.
Supplies
• White sheet OR 2 yards (approx.) of white or cream fabric: It should be long enough to hang from your shoulder to the floor. If you want it to be knee-length, you’ll only need about 1.5 yards or less.
• Safety pins: We’ll be pinning the fabric together, but you can also sew it together.
• Gold rope, belt, or ribbon
• 2 brooches (optional)
Making a Greek Chiton
1. Cut the Fabric
Cut the fabric lengthwise so you have two long rectangles. One rectangle is the front, and the other is the back. If you’d like to have a knee-length chiton (more common for men), this is a good time to cut it shorter. (Bonus: If you don’t like the frayed edge at the bottom of the fabric, you can glue gold ribbon along the bottom edge to cover it.)
2. Pin the Shoulders and Sides
With safety pins, fasten the top corners of the front to the top corners of the back. You’ll want to bunch the fabric together a bit as you pin it. Be sure to tuck in the edges of the fabric if it’s fraying. Next, pin the sides of fabric together along your ribcage. It doesn’t have to be perfect, this is to help keep the fabric from blowing open.
3. Tie on Your Belt
Tie your belt around your waist or rib cage. You can use any kind of belt, rope, or ribbon. You can even paint something gold if you don’t have anything.
4. Add the Brooches
Pin your brooches to your shoulders. You can use them to hide the safety pins. I didn’t have any brooches, so I bought some earrings at a thrift store, glued them together, and added a pin to the back. You could even make your own out of cardboard or craft foam and paint them. Get creative!
Accessories and Props for Your Specific Greek Character
It’s time to customize your outfit with some props. They don’t have to be complicated in order to be effective. Below are some simple ideas to help identify yourself as a specific character: 1. Lightning Bolt and Beard = Zeus, King of the Greek Gods Lightning Bolt: Draw a lightning bolt on foam board or poster board; cut out the shape and color with silver paint. Beard: Paint on a beard with face paint OR purchase a beard from a party or costume store.
2. Laurel Wreath = Apollo, God of Music, Arts, and Enlightenment Laurel Wreath: Create a headband with poster board. Draw leaves and cut them out. Use hot glue to stick the leaves in place, overlapping as you go. Color with gold spray paint.
3. Feathery Wings = Eros, God of Love (Cupid!), or Nike, Goddess of Victory Wings: Purchase wings from a costume or party store OR draw wings on poster board. Cut out the shape of the wings, attach elastic straps with hot glue, and loop over shoulders.
4. Shield, Spear, Helmet = Athena, Goddess of Warfare Shield: Find a large plastic platter or cut a circle out of foam board. Glue on a handle made of foam board or cardboard; color with gold spray paint. Spear: Use a broom handle or dowel and color with gold spray paint. Draw a spearhead on craft foam. cut out two spearheads from the craft foam. Glue the craft foam together at the edges, and slide the broom handle into the pocket formed by the two pieces. Helmet: Purchase gladiator-style helmet at a costume or party store; color with gold paint OR get creative with craft foam and hot glue to make your own!
4. Shield, Spear/Sword = Hercules or Achilles, Hero of the Trojan War Shield and Spear: Follow steps above for Athena.
6. Gold Tiara/Crown, Veil = Hera, Goddess of Marriage and wife of Zeus Tiara/Crown: Make a crown out of poster board; color with gold spray paint. Veil: Take a piece of sheer fabric or leftovers from your chiton; attach to tiara/crown with staples.
7. Roses and Scallop Shells = Aphrodite, Goddess of Love Roses: Purchase some fake roses or flowers from a thrift store; color them with gold spray paint. Scallop Shells: Draw some shells on poster board; color with gold spray paint and add the shells to your flower bouquet.
Need to look up some other characters from Greek mythology? Check out this list on Wikipedia for more ideas.
I had my paints out at an “Arabian Nights”-themed party and painted the night away! I painted 22 people over the course of the evening, but as usual, I started forgetting to snap photos of each one. I’m glad I created the boards of design options, it really helped give people direction. All of the designs done with brush and sponge.
Design Board. Offering limited options is a great way to manage your time with a large group of people.Design Board (I added more options after taking this photo).
HARPY: Classical Mythology . a ravenous, filthy monster having a woman’s head and a bird’s body.
Below are some instructions on what I did to accomplish this harpy costume for Halloween 2011.
Step 1: Plan It Out
I first started out with a sketch based on some good ol’ Googling of harpies. I particularly liked the ones in World of Warcraft. As you can see, my final product evolved a bit differently from the sketch (colored wings became a bit too time consuming):
Harpy Costume Sketch | Breanna Cooke
Step 2: Make Giant Wings
The frame is the most critical part to having awesome wings. I commissioned the help of an expert in wing-making, Danielle Hurley. Her craftsmanship is top-notch and the frame fit me perfectly. I’d highly recommend contacting her if you’d like some wings. Check out more of her work on her website or her blog.
To support the feathers, I made a frame from chicken wire and glued it onto some black canvas.
I used black turkey quills and started applying from the bottom up. I ordered 500 feathers (250 of each wing side) and probably used about 300-350. I also used bits of black down from a feather boa to mask the transition of quills at the top of the wings.
Step 3: Make Bird Feet
I built my bird feet on top of an existing pair of boots that I knew were comfortable. It helped that they already had pointed toes. I used green craft foam to shape the toes and hot-glued them on. The talons are fake bear claws. The bear claws were more proportional to my body than fake eagle talons.
I painted the green foam with brown paint so it would all match. Then I covered the boots in tan liquid latex. In hindsight, this may not have been the best material, but it gave it the rubbery skin-like texture I wanted.
I painted the final boots with acrylic paints (again, maybe not the best type of paint since it kept cracking).
Step 4: Paint Yourself
I painted myself with professional grade body paint using a sponge and brush. I usually use the water activated cakes from the Paradise line by Mehron since I can buy them locally at Norcosto in Dallas. I also order online from Silly Farm when I have more time to spare.
The fangs were from a Halloween shop. I recommend going for the most realistic ones, even if they cost more. The nails were also from the costume shop and glued on with nail glue.
Step 5: Go Scare Small Children or Become an Object of Envy at a ComicCon
This painting was created as a birthday present for a musical friend. Above is the finished product and below are some of the process images. The painting was done on scrap particle board with Liquitex Acrylic paints.
[slideshow]
Cookie Consent
We use cookies to improve your experience on our site. By using our site, you consent to cookies.
Websites store cookies to enhance functionality and personalise your experience. You can manage your preferences, but blocking some cookies may impact site performance and services.
Essential cookies enable basic functions and are necessary for the proper function of the website.
Name
Description
Duration
Cookie Preferences
This cookie is used to store the user's cookie consent preferences.
30 days
These cookies are needed for adding comments on this website.
Name
Description
Duration
comment_author
Used to track the user across multiple sessions.
Session
comment_author_email
Used to track the user across multiple sessions.
Session
comment_author_url
Used to track the user across multiple sessions.
Session
Statistics cookies collect information anonymously. This information helps us understand how visitors use our website.
Google Analytics is a powerful tool that tracks and analyzes website traffic for informed marketing decisions.
Contains information related to marketing campaigns of the user. These are shared with Google AdWords / Google Ads when the Google Ads and Google Analytics accounts are linked together.
90 days
__utma
ID used to identify users and sessions
2 years after last activity
__utmt
Used to monitor number of Google Analytics server requests
10 minutes
__utmb
Used to distinguish new sessions and visits. This cookie is set when the GA.js javascript library is loaded and there is no existing __utmb cookie. The cookie is updated every time data is sent to the Google Analytics server.
30 minutes after last activity
__utmc
Used only with old Urchin versions of Google Analytics and not with GA.js. Was used to distinguish between new sessions and visits at the end of a session.
End of session (browser)
__utmz
Contains information about the traffic source or campaign that directed user to the website. The cookie is set when the GA.js javascript is loaded and updated when data is sent to the Google Anaytics server
6 months after last activity
__utmv
Contains custom information set by the web developer via the _setCustomVar method in Google Analytics. This cookie is updated every time new data is sent to the Google Analytics server.
2 years after last activity
__utmx
Used to determine whether a user is included in an A / B or Multivariate test.
18 months
_ga
ID used to identify users
2 years
_gali
Used by Google Analytics to determine which links on a page are being clicked
30 seconds
_ga_
ID used to identify users
2 years
_gid
ID used to identify users for 24 hours after last activity
24 hours
_gat
Used to monitor number of Google Analytics server requests when using Google Tag Manager
1 minute
Marketing cookies are used to follow visitors to websites. The intention is to show ads that are relevant and engaging to the individual user.
A video-sharing platform for users to upload, view, and share videos across various genres and topics.
Registers a unique ID on mobile devices to enable tracking based on geographical GPS location.
1 day
VISITOR_INFO1_LIVE
Tries to estimate the users' bandwidth on pages with integrated YouTube videos. Also used for marketing
179 days
PREF
This cookie stores your preferences and other information, in particular preferred language, how many search results you wish to be shown on your page, and whether or not you wish to have Google’s SafeSearch filter turned on.
10 years from set/ update
YSC
Registers a unique ID to keep statistics of what videos from YouTube the user has seen.
Session
DEVICE_INFO
Used to detect if the visitor has accepted the marketing category in the cookie banner. This cookie is necessary for GDPR-compliance of the website.
179 days
LOGIN_INFO
This cookie is used to play YouTube videos embedded on the website.
2 years
VISITOR_PRIVACY_METADATA
Youtube visitor privacy metadata cookie
180 days
You can find more information in our Cookie Policy and .